> ## Documentation Index
> Fetch the complete documentation index at: https://docs.dwe.ai/llms.txt
> Use this file to discover all available pages before exploring further.
# stellarHD Quick Start Guide
> This guide will help you connect your stellarHD to your computer and receive an image! **Select your connector on the right.**
## Pass your cable through a bulkhead
For Epoxy or WetLink models, follow the cable pinout guide located on the specification page for your stellarHD model.
Below is an example of passing the exposed wiring through an M10 WetLink bulkhead to be installed onto your vehicle endcap.
 ## Connect your Camera to a Bulkhead
For Cobalt, follow the pinout guide located on the specification page for your stellarHD model.
Below is an example of a [pre-made cobalt bulkhead](https://dwe.ai/collections/our-parts-and-accessories/products/cobalt-to-jst-connector).
## Connect your Camera to a Bulkhead
For Cobalt, follow the pinout guide located on the specification page for your stellarHD model.
Below is an example of a [pre-made cobalt bulkhead](https://dwe.ai/collections/our-parts-and-accessories/products/cobalt-to-jst-connector).
 ## Connect your Camera to a Bulkhead
For SubConn, follow the pinout guide located on the specification page for your stellarHD model.
Below is an example of a [pre-made SubConn MCBH8M bulkhead](https://dwe.ai/collections/our-parts-and-accessories).
## Connect your Camera to a Bulkhead
For SubConn, follow the pinout guide located on the specification page for your stellarHD model.
Below is an example of a [pre-made SubConn MCBH8M bulkhead](https://dwe.ai/collections/our-parts-and-accessories).
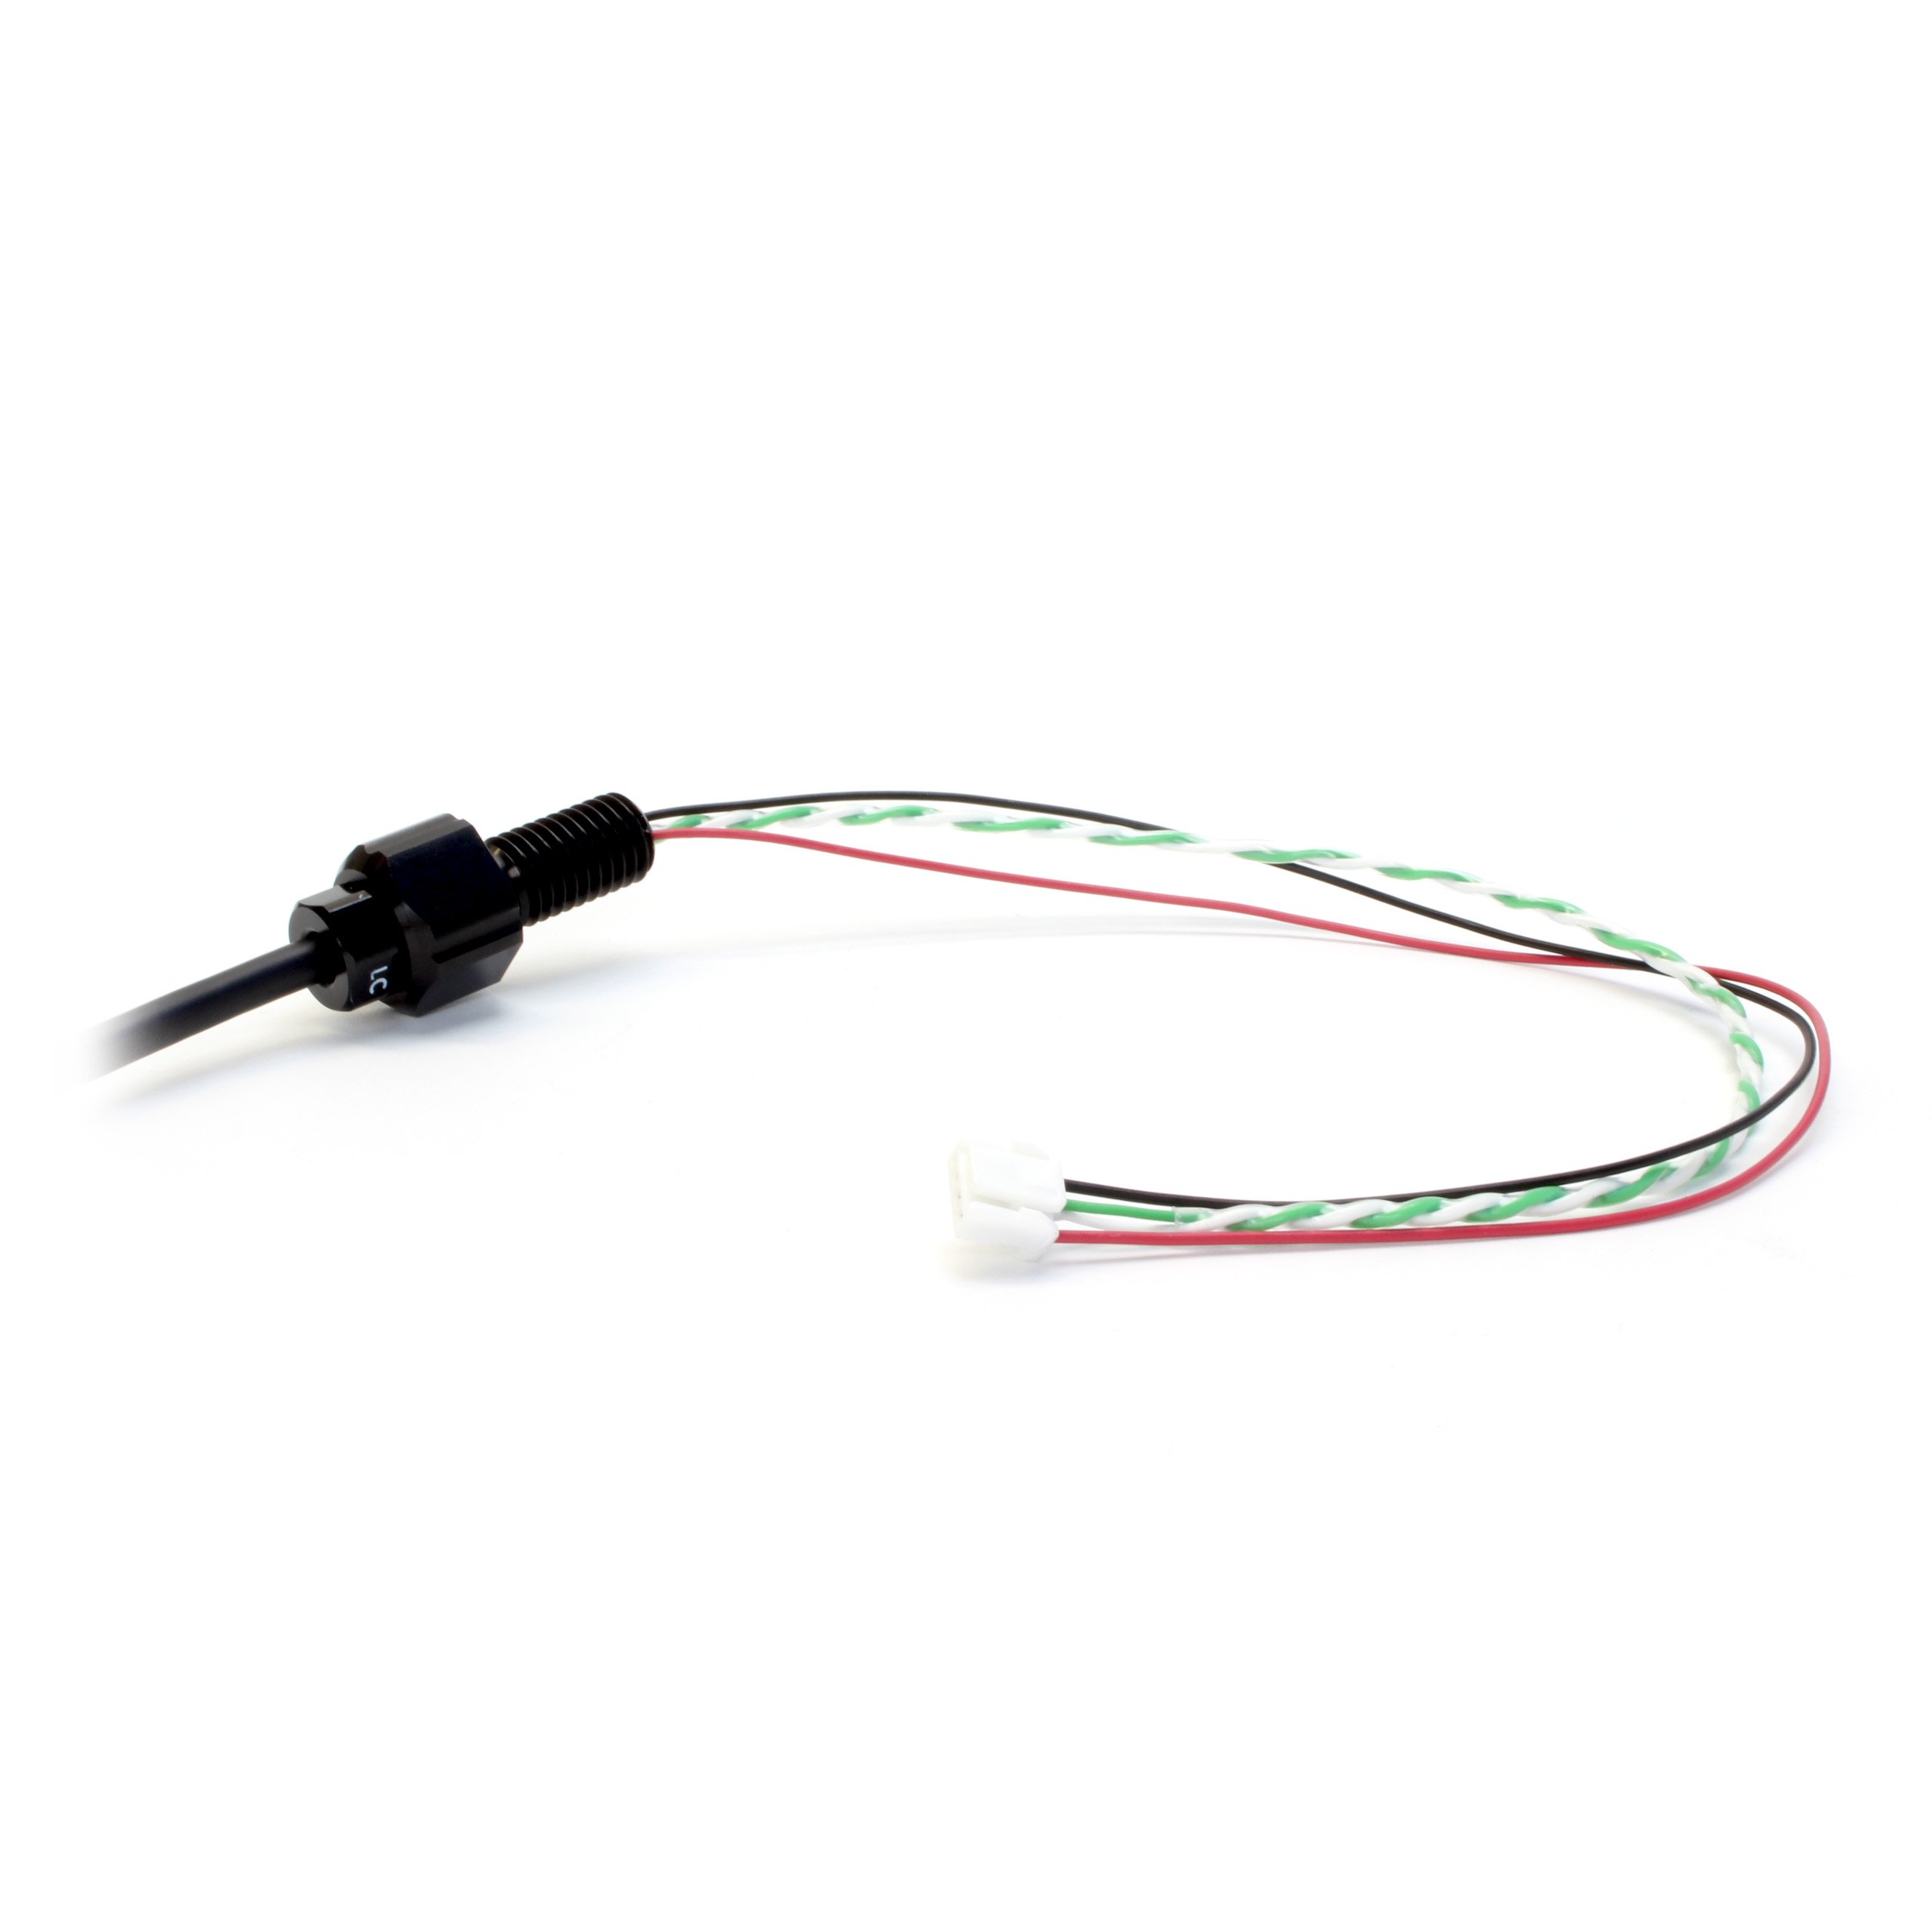
 ## Preparing the JST Cable Connection
 | Color | Function | Wire Gauge (AWG) |
| ----- | ------------------ | ---------------- |
| Red | 5V | 24 |
| White | D- (Data Negative) | 28 |
| Green | D+ (Data Positive) | 28 |
| Black | Ground | 24 |
| Blue | FSIN (Frame-Sync) | 28 |
Ensure you **do not mix up the +5V Power and Ground**. Doing so can permanently damage your device and void warranty.
| Color | Function | Wire Gauge (AWG) |
| ----- | ------------------ | ---------------- |
| Red | 5V | 24 |
| White | D- (Data Negative) | 28 |
| Green | D+ (Data Positive) | 28 |
| Black | Ground | 24 |
| Blue | FSIN (Frame-Sync) | 28 |
Ensure you **do not mix up the +5V Power and Ground**. Doing so can permanently damage your device and void warranty.
 ## Test Your Camera Online
Connect the USB cable to a computer to confirm the camera is working and in the correct orientation.
You can test the camera using our tool below.
Convenient tool to test your USB camera feeds.
If the camera is showing up on your computer, you are done! You can now move onto using more advanced features of the stellarHD.
If you are having issues, please check our [troubleshooting](#troubleshooting) below.
## Advanced Features
Click here for a guide on how to synchronize multiple stellarHD cameras that feature a frame-sync cable.
Click here to see our resources for using the stellarHD with OpenCV.
## Troubleshooting
### Double-Check Your Wiring Setup
[Ensure that the wire colors match](#preparing-the-jst-cable-connection) their respective functions when connected to the JST connector. Even a single crossed wire will prevent the camera from being recognized.
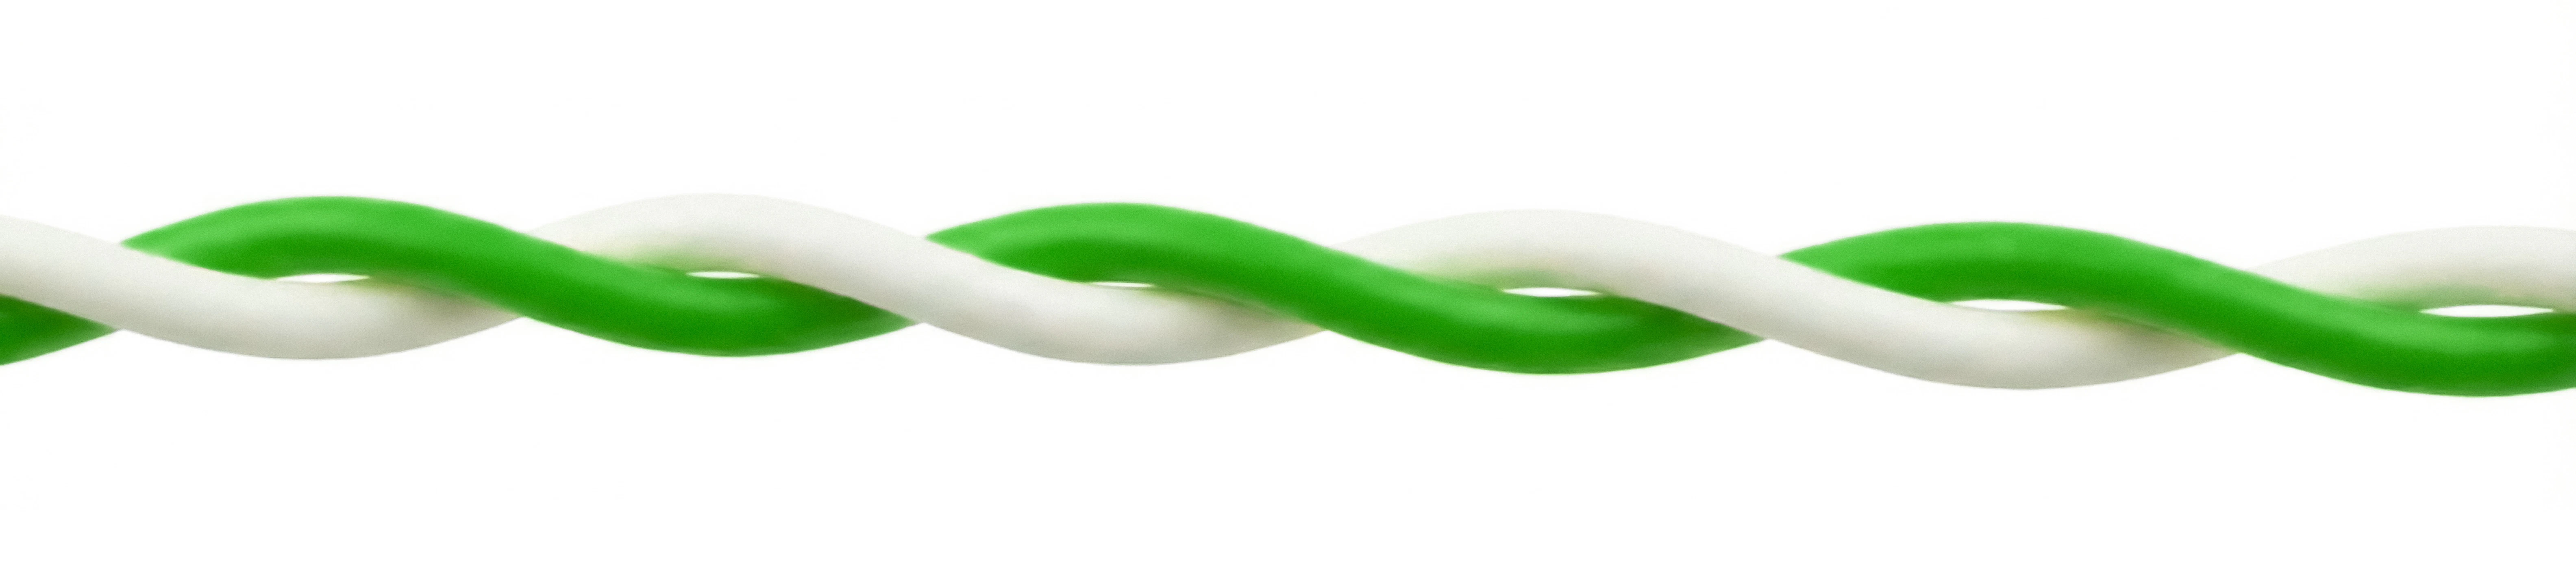
### Ensure the Data Wires are Twisted (Crucial)
The **White (D-)** and **Yellow/Green (D+)** wires must be twisted/intertwined together.
Because this is a USB 2.0 High-Speed connection, twisting these pairs is required
in order to prevent interference and ensure the data signal is strong enough for your
computer to recognize the camera.
### Check Connections and Power
Make sure the wires are seated securely in the JST connector.
Make sure the JST is pushed all the way into the USB adapter, and the adapter is securely plugged into your USB port.
The camera can draw up to 260mA of power (at 5V). Try plugging the adapter directly into your computer, rather than a low-power USB hub, to ensure it is getting sufficient current.
### OS Hardware Detection
Check if your computer's operating system is detecting the camera at a hardware level, even if it's not showing an image yet. Since it connects via USB, we are looking for a USB device connection.
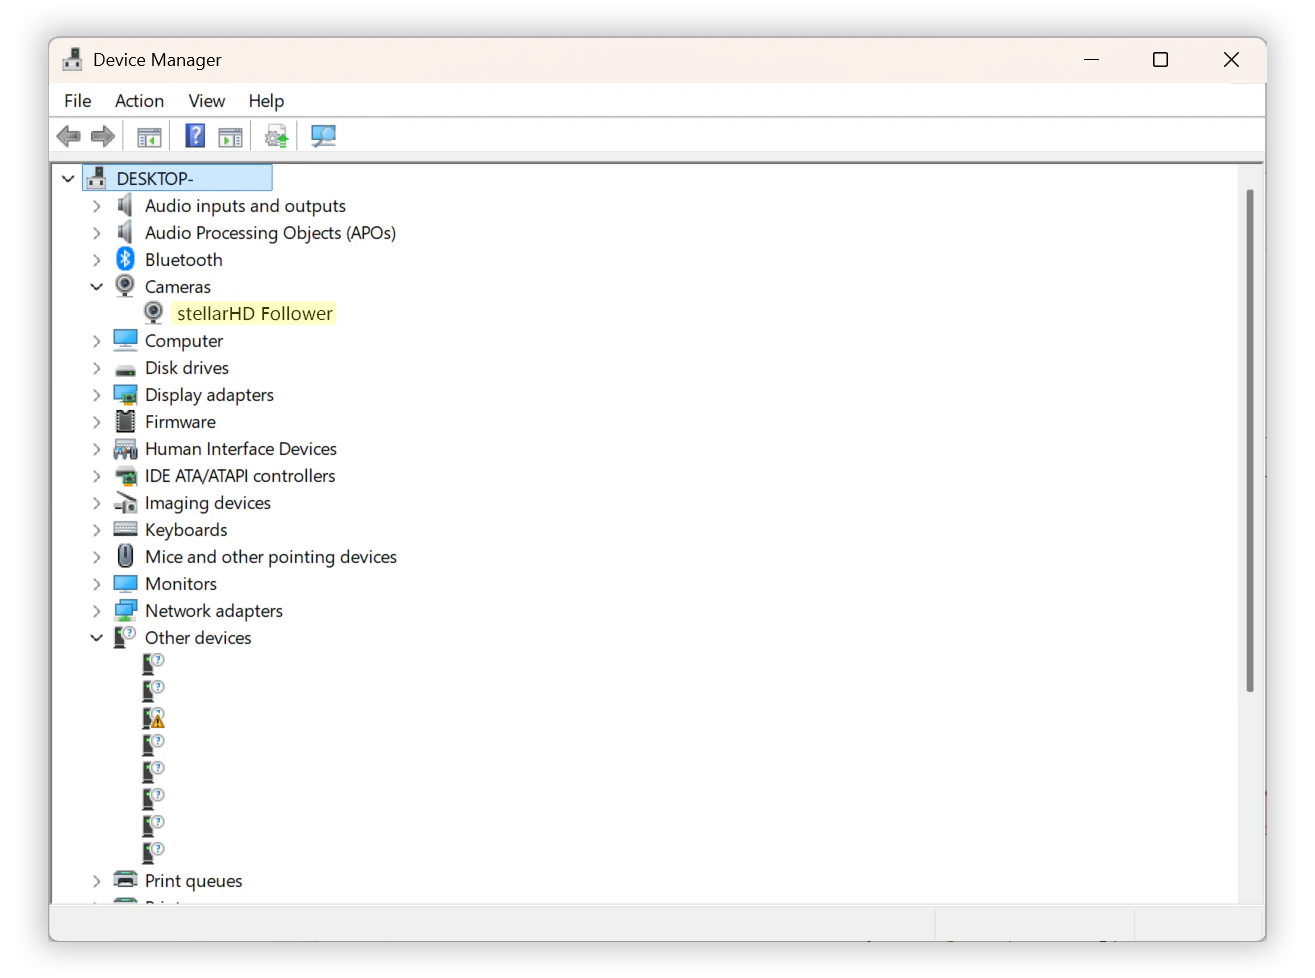
1. Right-click the **Start button** (or press `Win` + `X`) and select **Device Manager**.
2. Expand the following categories to look for the camera, `stellarHD`:
* **Cameras**
* **Imaging devices**
* **Sound, video and game controllers**
3. If the wiring is slightly off or the data lines aren't twisted properly, Windows might detect *something* but not know what it is. Expand **Universal Serial Bus controllers** and look for anything labeled **Unknown USB Device (Device Descriptor Request Failed)**.
Keep the Device Manager open and unplug/replug the USB adapter. The list will refresh; watch to see if any new devices appear or disappear.
## Test Your Camera Online
Connect the USB cable to a computer to confirm the camera is working and in the correct orientation.
You can test the camera using our tool below.
Convenient tool to test your USB camera feeds.
If the camera is showing up on your computer, you are done! You can now move onto using more advanced features of the stellarHD.
If you are having issues, please check our [troubleshooting](#troubleshooting) below.
## Advanced Features
Click here for a guide on how to synchronize multiple stellarHD cameras that feature a frame-sync cable.
Click here to see our resources for using the stellarHD with OpenCV.
## Troubleshooting
### Double-Check Your Wiring Setup
[Ensure that the wire colors match](#preparing-the-jst-cable-connection) their respective functions when connected to the JST connector. Even a single crossed wire will prevent the camera from being recognized.
### Ensure the Data Wires are Twisted (Crucial)
The **White (D-)** and **Yellow/Green (D+)** wires must be twisted/intertwined together.
Because this is a USB 2.0 High-Speed connection, twisting these pairs is required
in order to prevent interference and ensure the data signal is strong enough for your
computer to recognize the camera.
### Check Connections and Power
Make sure the wires are seated securely in the JST connector.
Make sure the JST is pushed all the way into the USB adapter, and the adapter is securely plugged into your USB port.
The camera can draw up to 260mA of power (at 5V). Try plugging the adapter directly into your computer, rather than a low-power USB hub, to ensure it is getting sufficient current.
### OS Hardware Detection
Check if your computer's operating system is detecting the camera at a hardware level, even if it's not showing an image yet. Since it connects via USB, we are looking for a USB device connection.
1. Right-click the **Start button** (or press `Win` + `X`) and select **Device Manager**.
2. Expand the following categories to look for the camera, `stellarHD`:
* **Cameras**
* **Imaging devices**
* **Sound, video and game controllers**
3. If the wiring is slightly off or the data lines aren't twisted properly, Windows might detect *something* but not know what it is. Expand **Universal Serial Bus controllers** and look for anything labeled **Unknown USB Device (Device Descriptor Request Failed)**.
Keep the Device Manager open and unplug/replug the USB adapter. The list will refresh; watch to see if any new devices appear or disappear.
 1. Hold down the **Option** key on your keyboard, then click the **Apple logo** () in the top left corner of your screen.
2. Select **System Information** (this is usually "About This Mac" if you don't hold the Option key).
Unplugging and replugging the camera while on this screen (and pressing `Cmd` + `R` to refresh) will help you spot if the system is registering a hardware connection.
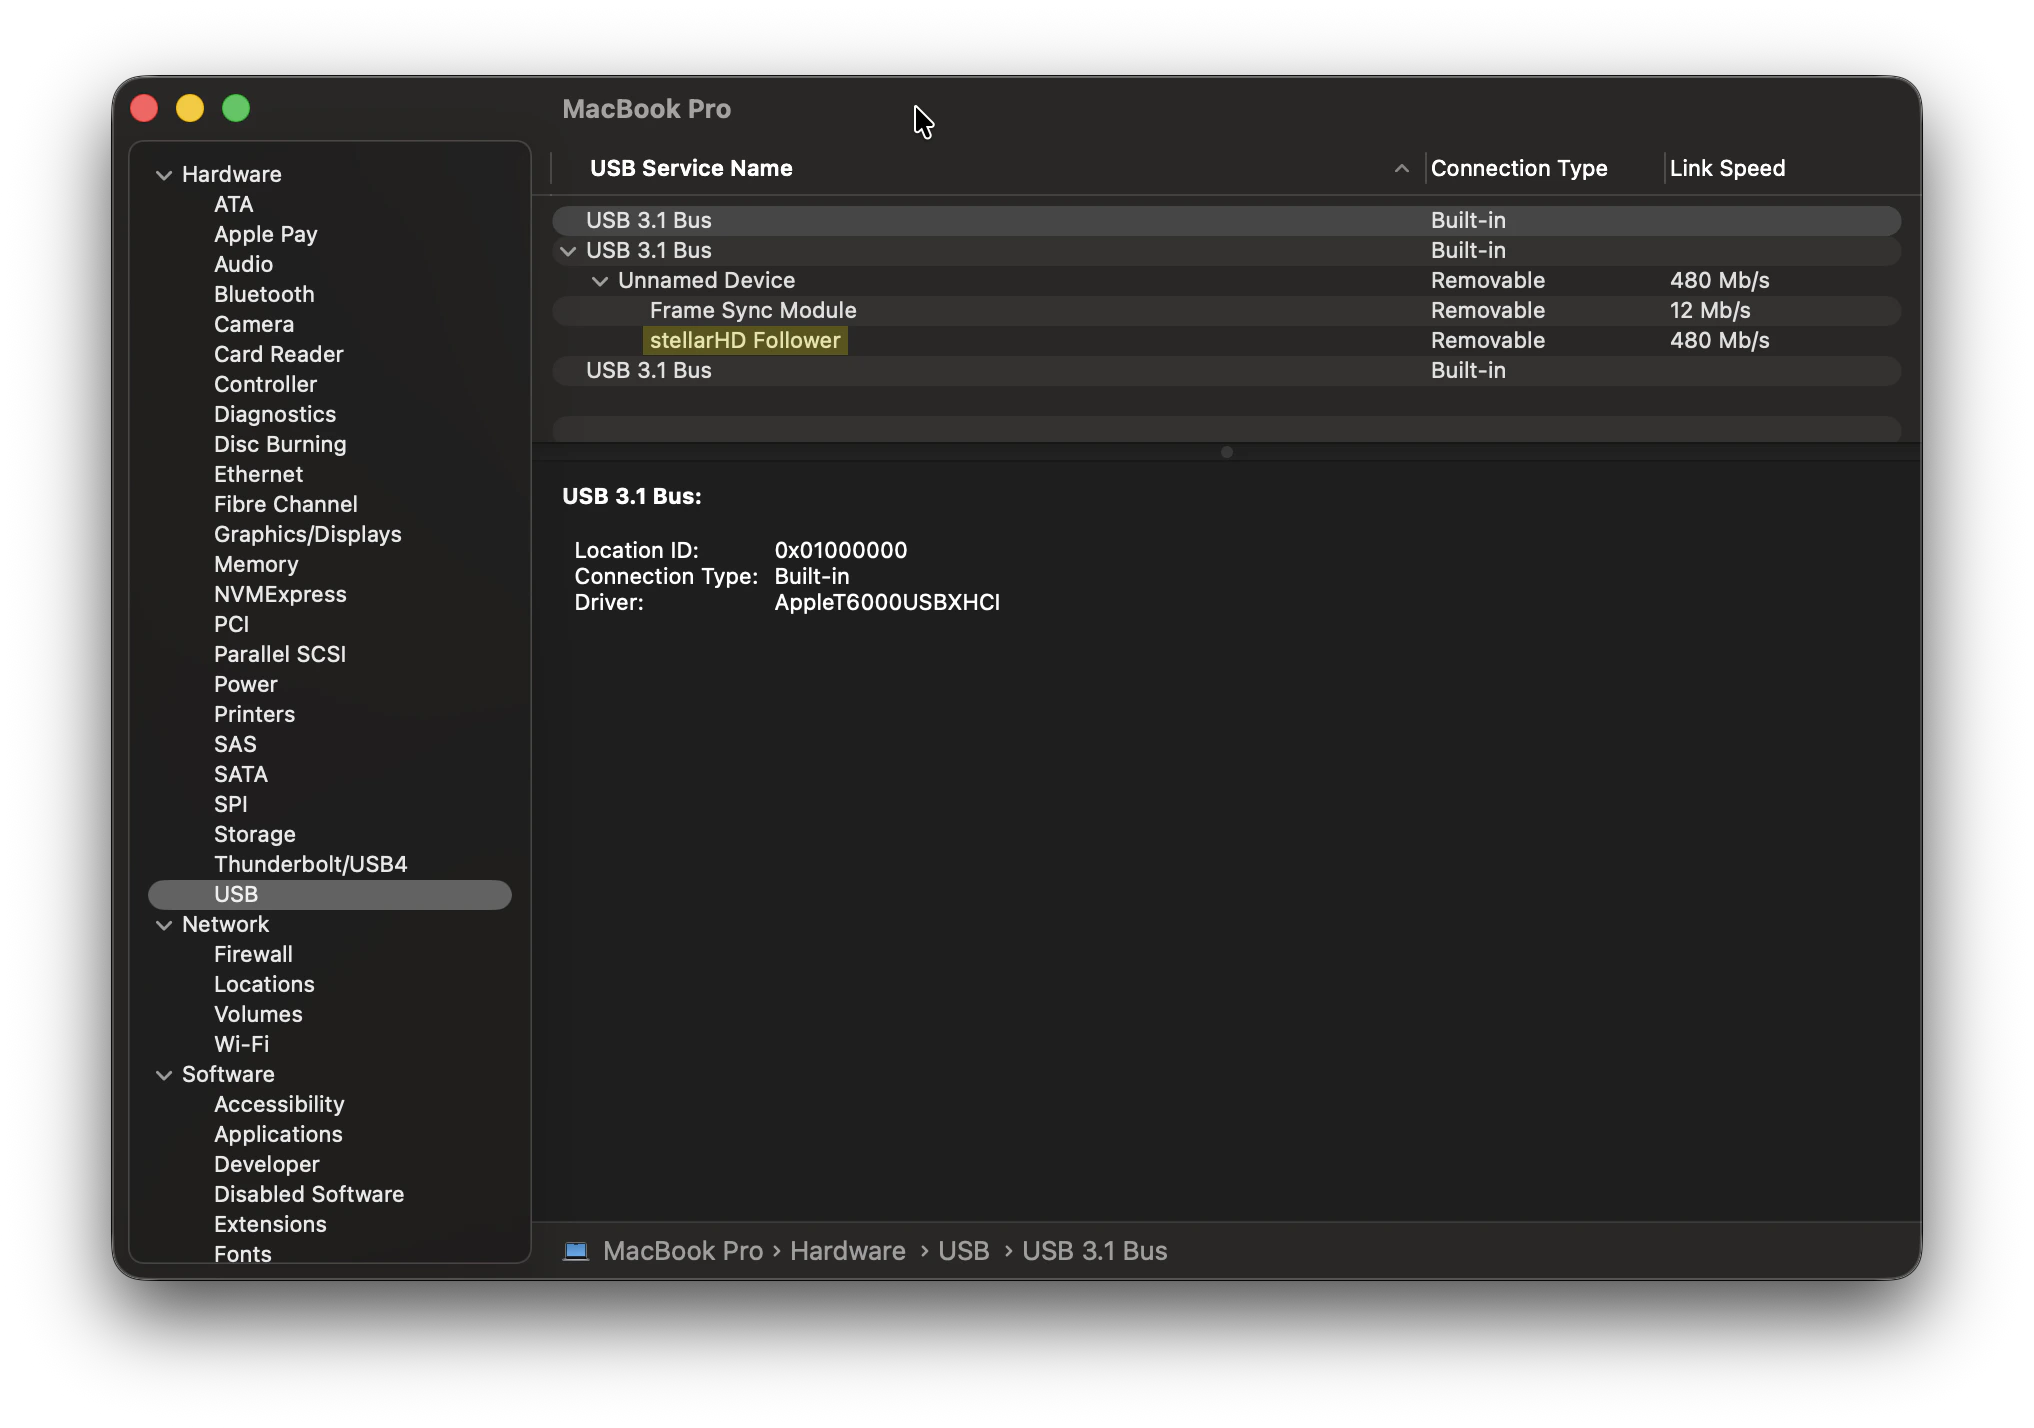
3. In the left-hand sidebar under the "Hardware" section, click on **USB**.
4. Check the **USB Device Tree** on the right. Look for the stellarHD camera or an unrecognized USB device.
1. Hold down the **Option** key on your keyboard, then click the **Apple logo** () in the top left corner of your screen.
2. Select **System Information** (this is usually "About This Mac" if you don't hold the Option key).
Unplugging and replugging the camera while on this screen (and pressing `Cmd` + `R` to refresh) will help you spot if the system is registering a hardware connection.
3. In the left-hand sidebar under the "Hardware" section, click on **USB**.
4. Check the **USB Device Tree** on the right. Look for the stellarHD camera or an unrecognized USB device.
 1. Open your terminal.
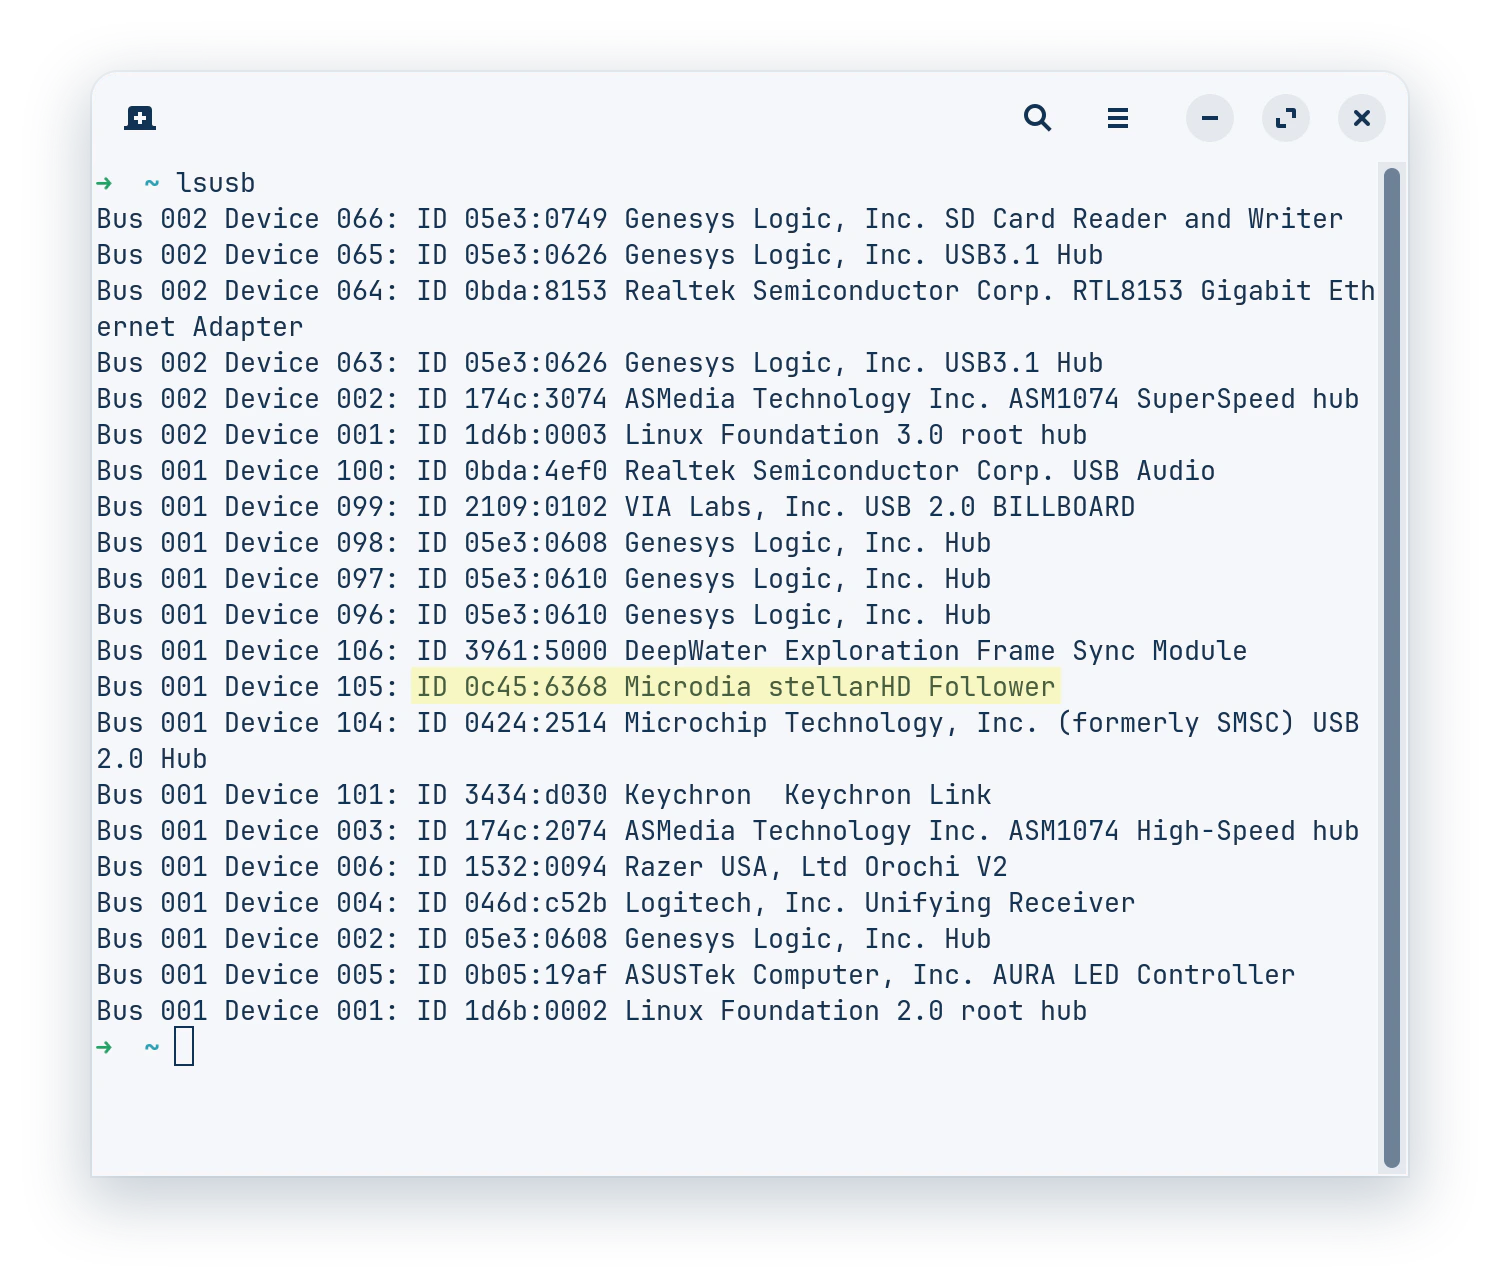
2. Type `lsusb` and press `Enter`. This lists all connected USB buses and the devices attached to them. Look for a device name that mentions the camera or an unnamed device that appears when plugged in.
* You can also use this one-line command to detect a valid stellarHD camera:
```
lsusb | grep -qiE "stellarhd|microdia|0c45" && echo "stellarHD connected!"
```
3. To see if Linux recognizes it specifically as a video device (since it is V4L2 compatible), run:
```bash theme={null}
ls -l /dev/video*
```
4. For real-time connection logs, run the following command. When you plug the camera in, you should see a flurry of text appear, indicating whether the USB connection was successful or if there were enumeration errors (like `device descriptor read/64, error`).
```bash theme={null}
sudo dmesg -w | grep usb
```
1. Open your terminal.
2. Type `lsusb` and press `Enter`. This lists all connected USB buses and the devices attached to them. Look for a device name that mentions the camera or an unnamed device that appears when plugged in.
* You can also use this one-line command to detect a valid stellarHD camera:
```
lsusb | grep -qiE "stellarhd|microdia|0c45" && echo "stellarHD connected!"
```
3. To see if Linux recognizes it specifically as a video device (since it is V4L2 compatible), run:
```bash theme={null}
ls -l /dev/video*
```
4. For real-time connection logs, run the following command. When you plug the camera in, you should see a flurry of text appear, indicating whether the USB connection was successful or if there were enumeration errors (like `device descriptor read/64, error`).
```bash theme={null}
sudo dmesg -w | grep usb
```