> ## Documentation Index
> Fetch the complete documentation index at: https://docs.dwe.ai/llms.txt
> Use this file to discover all available pages before exploring further.
# 여러 카메라의 프레임 동기화
> stellarHD 카메라를 동기화하는 방법에 대한 가이드.
***이 문서는 아직 개선 중이며 작성 중입니다!***
**전기적** 동기화와 **소프트웨어** 동기화가 모두 필요합니다. 자세한 지침은 아래를 참조하세요.
# 전기 배선 가이드
## 개요
이 모드는 **외부 클럭 신호를 사용하지 않는** 구성에 적합합니다.
한 대의 카메라를 `leader` 모드(동기화 신호 출력)로, 나머지 모든 카메라를 `follower` 모드로 사용하게 됩니다.
Leader와 Follower 모드 간 카메라 업데이트 가이드는 여기를 클릭하세요.

 ***
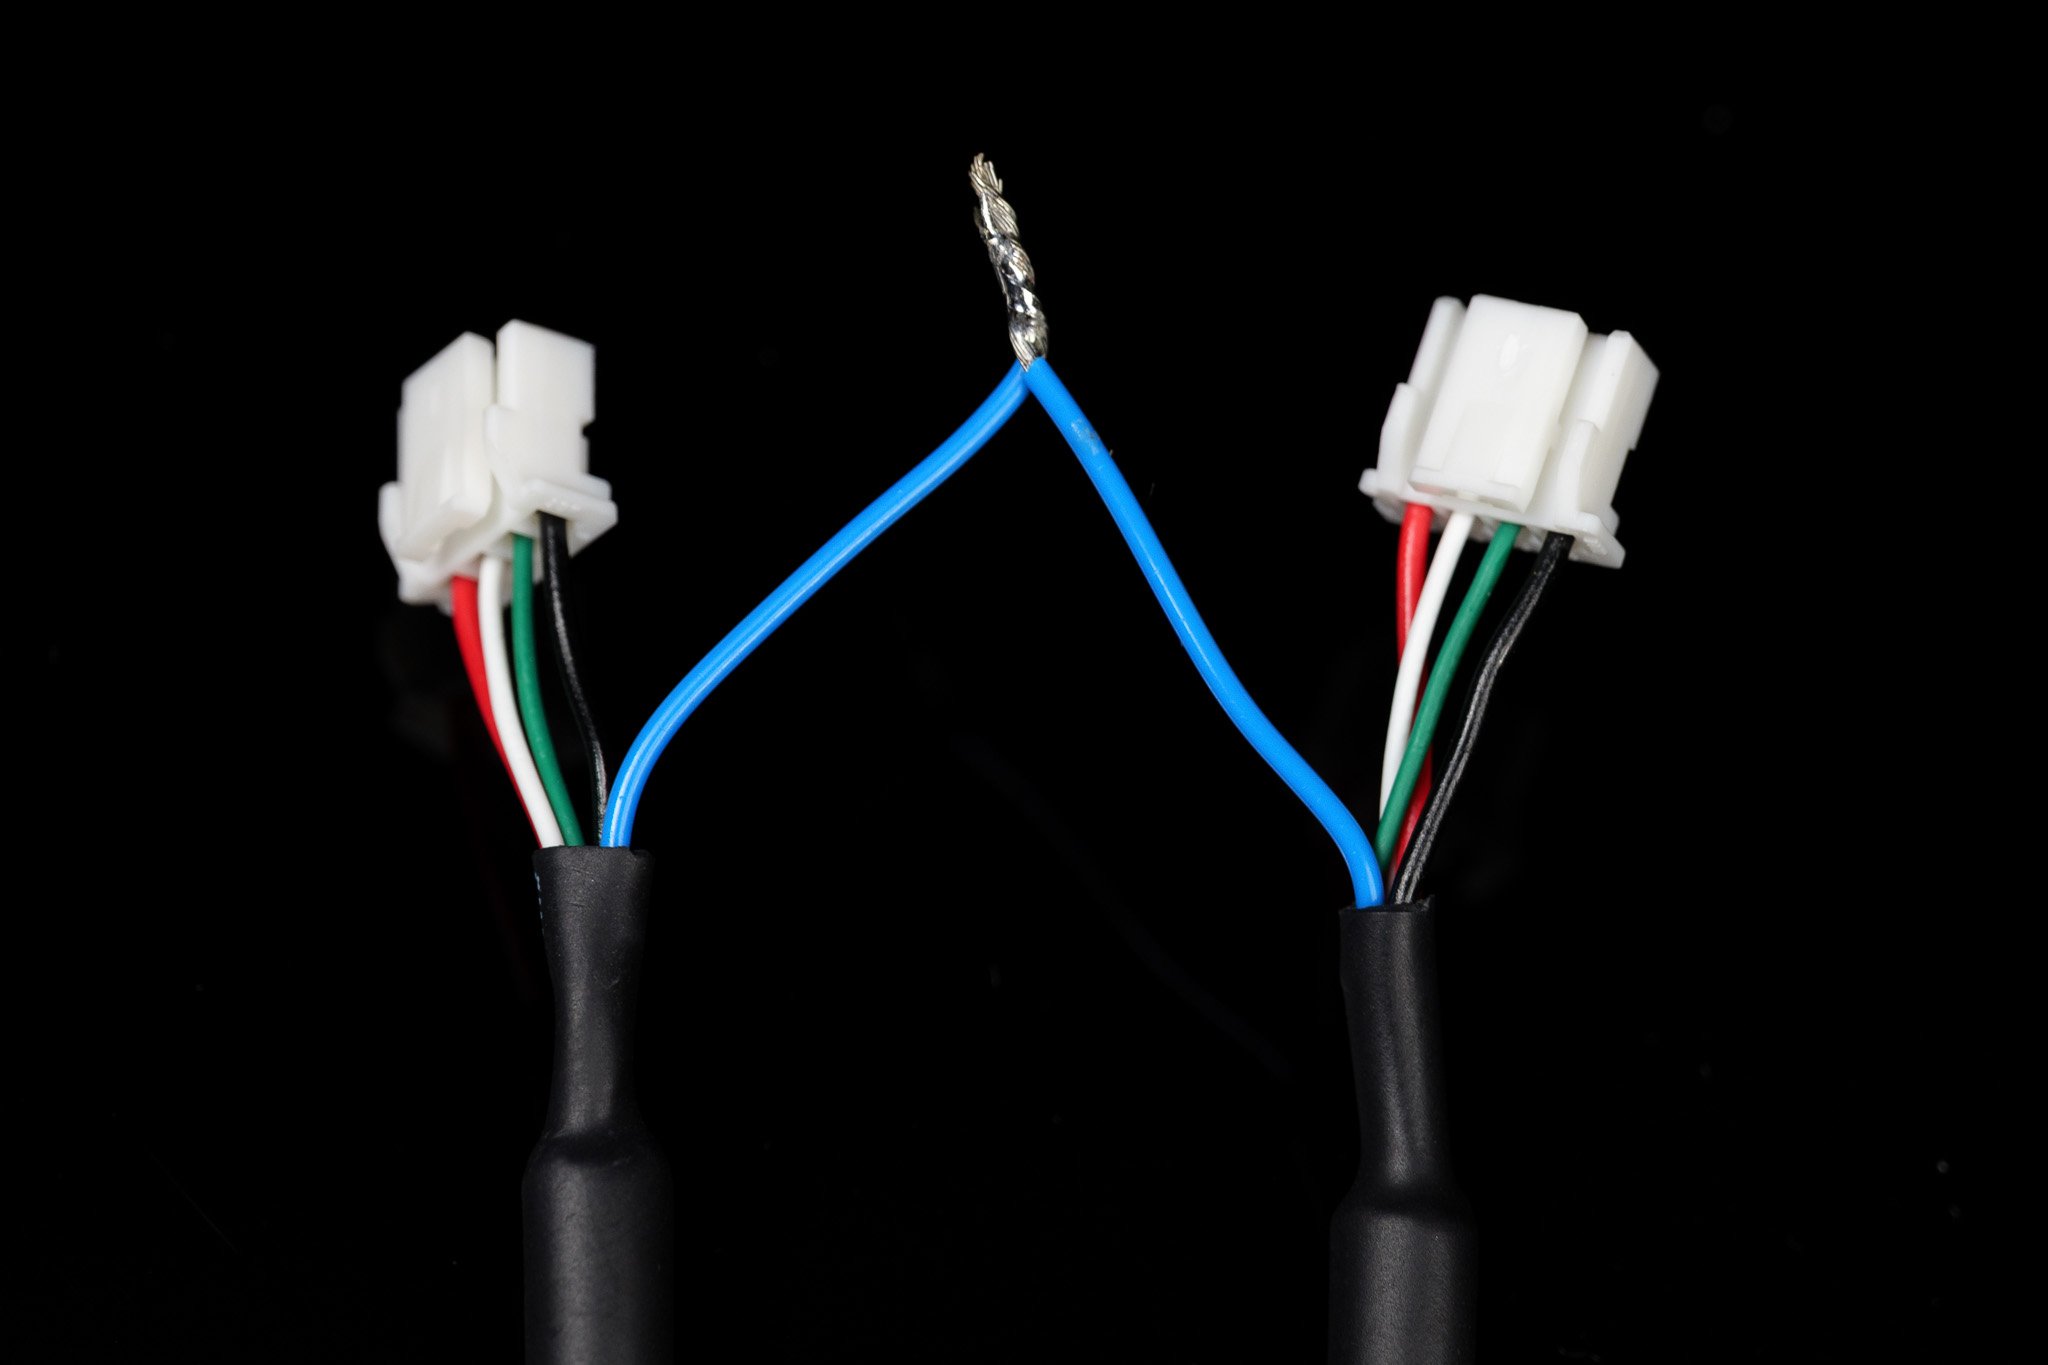
## 배선
***
## 배선
 ### 예시
 ## 개요
이 모드는 모든 카메라에 동기화 신호를 출력하기 위해 **외부 클럭 신호를 사용하는** 구성에 적합합니다.
이 모드에서는 모든 카메라가 `follower` 모드로 설정되어야 합니다.
Leader와 Follower 모드 간 카메라 업데이트 가이드는 여기를 클릭하세요.
## 개요
이 모드는 모든 카메라에 동기화 신호를 출력하기 위해 **외부 클럭 신호를 사용하는** 구성에 적합합니다.
이 모드에서는 모든 카메라가 `follower` 모드로 설정되어야 합니다.
Leader와 Follower 모드 간 카메라 업데이트 가이드는 여기를 클릭하세요.

 ***
## 배선
외부 프레임 동기화 사양은 해당 장치의 제품 페이지를 확인하세요.
***
## 배선
외부 프레임 동기화 사양은 해당 장치의 제품 페이지를 확인하세요.
 ***
## 외부 클럭 신호 생성
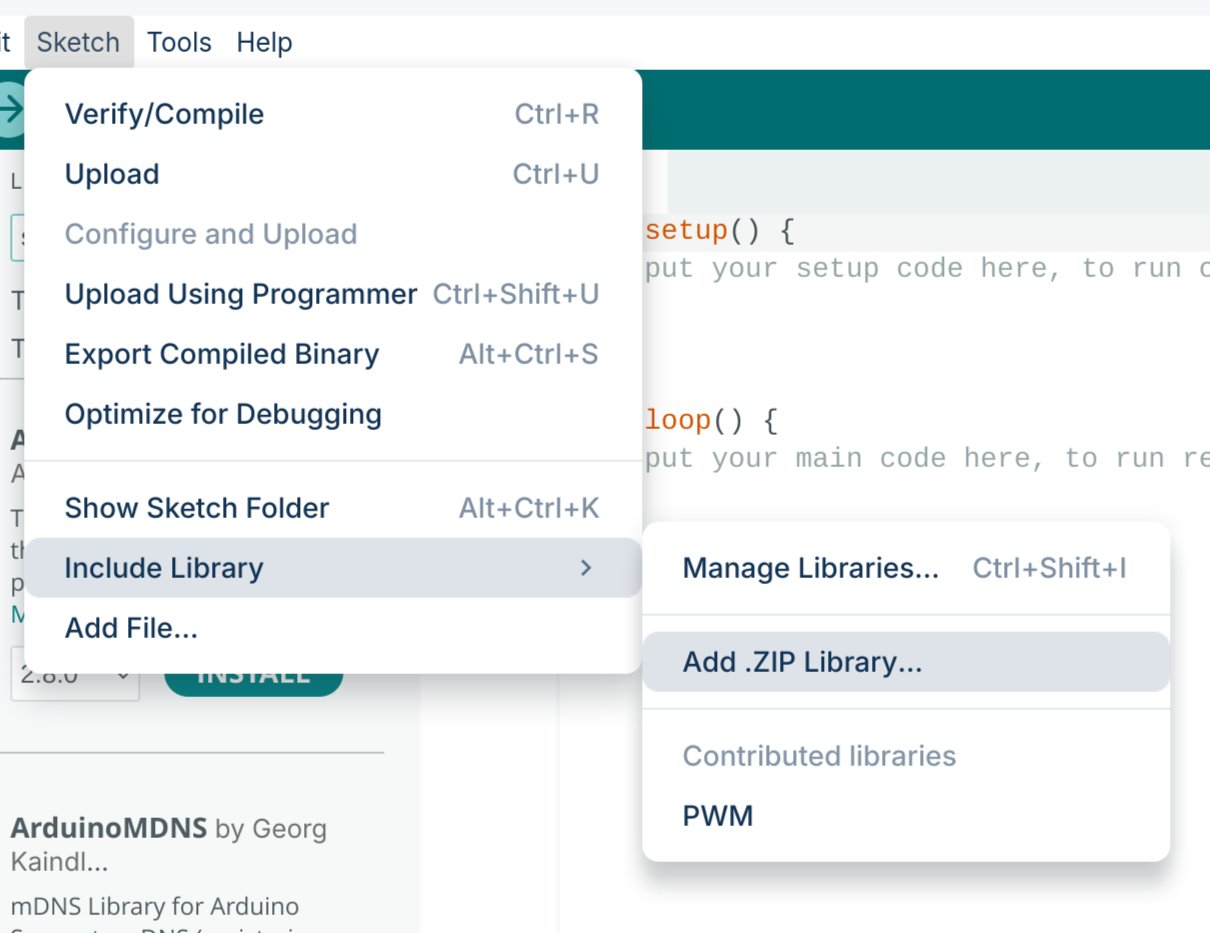
### Arduino 통합
현재 **Arduino Uno (ATmega328P)** 만 이 구성에서 작동이 *확인된* 보드입니다.
PWM 라이브러리의 소스 코드를 여기에서 다운로드하세요: [ArduinoPWM v1.0.0](https://github.com/DeepWaterExploration/ArduinoPWM/archive/refs/tags/v1.0.0.zip)
다운로드한 `.ZIP` 라이브러리를 Arduino IDE에 가져옵니다.
***
## 외부 클럭 신호 생성
### Arduino 통합
현재 **Arduino Uno (ATmega328P)** 만 이 구성에서 작동이 *확인된* 보드입니다.
PWM 라이브러리의 소스 코드를 여기에서 다운로드하세요: [ArduinoPWM v1.0.0](https://github.com/DeepWaterExploration/ArduinoPWM/archive/refs/tags/v1.0.0.zip)
다운로드한 `.ZIP` 라이브러리를 Arduino IDE에 가져옵니다.
 아래 두 스케치 중 하나를 Arduino에 업로드하세요.
* **간단한 제어:** 가장 빠르게 시작할 수 있지만 FPS를 조정하려면 펌웨어를 다시 플래시해야 합니다.
* **시리얼 제어:** 다시 플래시하지 않고도 주파수와 듀티 사이클을 실시간으로 조정할 수 있습니다 (장치의 전원이 꺼지면 설정이 초기화됩니다).
```cpp theme={null}
#include
// Pin configuration
int pin = 9; // Pin
int value = 127; // Initial value for the PWM duty cycle
// SET FREQUENCY HERE
float frequency = 60; // Initial frequency in Hz
void setup()
{
// Initialize all timers except for timer0 to save timekeeping tasks
InitTimersSafe();
// Set the initial PWM frequency and duty cycle
if (SetPinFrequencySafe(pin, frequency))
{
pwmWrite(pin, value);
Serial.println("PWM frequency and initial duty cycle set.");
}
else
{
Serial.println("Failed to set frequency.");
}
}
```
```cpp theme={null}
#include
// Pin configuration
int pin = 9; // Pin
int value = 127; // Initial value for the PWM duty cycle
float frequency = 60; // Initial frequency in Hz
void setup()
{
Serial.begin(9600);
// Initialize all timers except for timer0 to save timekeeping tasks
InitTimersSafe();
// Set the initial PWM frequency and duty cycle
if (SetPinFrequencySafe(pin, frequency))
{
pwmWrite(pin, value);
Serial.println("PWM frequency and initial duty cycle set.");
}
else
{
Serial.println("Failed to set frequency.");
}
}
void loop()
{
if (Serial.available())
{
// Read frequency and duty cycle values over Serial
String inputString = Serial.readStringUntil('\n');
inputString.trim();
int freqDutySplitIndex = inputString.indexOf(',');
if (freqDutySplitIndex != -1)
{
String freqStr = inputString.substring(0, freqDutySplitIndex);
String dutyStr = inputString.substring(freqDutySplitIndex + 1);
// Parse floats
float newFrequency = freqStr.toFloat();
int newDutyCycle = dutyStr.toInt();
// Validate frequency range
if (newFrequency >= 1 && newFrequency <= 2000000)
{
// Set the PWM frequency and apply duty cycle
if (SetPinFrequencySafe(pin, newFrequency))
{
value = map(constrain(newDutyCycle, 0, 100), 0, 100, 0, 255);
pwmWrite(pin, value);
Serial.print("Set frequency to: ");
Serial.print(newFrequency);
Serial.print(" Hz, duty cycle to: ");
Serial.print(newDutyCycle);
Serial.println("%");
}
else
{
Serial.println("Failed to set new frequency.");
}
}
else
{
Serial.println("Invalid frequency value.");
}
}
else
{
Serial.println("Invalid input format. Use frequency,dutycycle (e.g., 60,50).");
}
}
}
```
이 코드를 사용하면 즉시 PWM 신호를 수정할 수 있습니다. 시리얼 모니터를 `9600` 보드레이트로 열고 `{FREQUENCY},{DUTY_CYCLE}` 형식으로 명령을 보내세요 (예: 60Hz, 50% 듀티 사이클의 경우 `60,50`).
***
## 동기화된 비디오 Python 라이브러리 (Linux)
곧 출시될 SDK 외에도, 현재 카메라 설정에서 동기화된 프레임을 가져오는 간단한 Python 프로세스를 제공합니다. *(참고: 향후 완전한 기능을 갖춘 SDK로 대체될 수 있습니다.)*
사용자 정의 Linux Python 라이브러리를 설치하고 사용하려면 GitHub 가이드를 따르세요.
***
## 동기화된 스티칭 비디오
GStreamer를 사용하여 두 비디오 피드를 동기화하고 스티칭한 다음, 다른 프로그램에서 사용할 가상 장치를 만드는 방법을 다룹니다.
다음 명령을 사용하여 필요한 종속성을 설치하세요:
```bash theme={null}
sudo apt install -y libx264-dev libjpeg-dev \
libglib2.0-dev libgstreamer1.0-dev libgstreamer-plugins-base1.0-dev \
gstreamer1.0-tools gstreamer1.0-x gstreamer1.0-plugins-base gstreamer1.0-plugins-good \
gstreamer1.0-plugins-bad gstreamer1.0-libav libgstreamer-plugins-bad1.0-dev \
gstreamer1.0-plugins-ugly gstreamer1.0-gl \
v4l-utils
```
다음 명령을 실행하여 연결된 카메라를 찾으세요:
```bash theme={null}
v4l2-ctl --list-devices
```
**예시 출력:**
```text theme={null}
stellarHD Leader: stellarHD Lea (usb-0000:00:14.0-8.3):
/dev/video0
/dev/video1
/dev/media0
stellarHD Follower: stellarHD F (usb-0000:00:14.0-8.4):
/dev/video2
/dev/video3
/dev/media1
```
사용할 두 카메라의 장치 ID를 식별한 다음, 현재 나열되어 있지 **않은** 장치 ID 번호를 선택하세요.
이 예시에서는 위에 사용되지 않은 `9`를 사용하여 `stellarHD_stitched`라는 가상 장치를 생성합니다. 선택한 사용되지 않는 ID에 맞게 아래 명령의 `9`를 업데이트하세요:
```bash theme={null}
sudo modprobe v4l2loopback video_nr=9 \
card_label=stellarHD_stitched exclusive_caps=1
```
스티칭된 비디오를 생성하고 새 가상 장치로 스트림을 출력하는 파이프라인을 실행하세요:
```bash theme={null}
gst-launch-1.0 -v \
compositor name=mix \
sink_0::xpos=0 sink_0::ypos=0 sink_0::alpha=1 \
sink_1::xpos=1600 sink_1::ypos=0 sink_1::alpha=1 \
! jpegenc ! jpegdec ! videoconvert ! v4l2sink device=/dev/video9 \
v4l2src device=/dev/video0 ! image/jpeg,width=1600,framerate=60/1 ! jpegdec ! videorate ! mix.sink_0 \
v4l2src device=/dev/video2 ! image/jpeg,width=1600,framerate=60/1 ! jpegdec ! videorate ! mix.sink_1
```
동기화된 스티칭 비디오를 사용하는 동안 이 명령을 계속 실행해야 합니다. 카메라를 더 추가하거나, 해상도/프레임 속도를 변경하거나, 레이아웃을 변경하도록 이 명령을 수정할 수 있습니다.
OpenCV에서 `/dev/video9`를 사용하려면 샘플 코드를 따르세요.
루프백 장치를 안전하게 제거하려면 컴퓨터를 다시 시작하거나 다음 명령 시퀀스를 실행하세요:
**1. 현재 루프백 장치를 사용 중인 프로그램을 식별:**
```bash theme={null}
sudo lsof /dev/video*
```
**2. PID (프로세스 ID) 번호를 사용하여 프로세스 종료:**
```bash theme={null}
sudo kill
```
**3. 루프백 장치 제거:**
```bash theme={null}
sudo modprobe -r v4l2loopback
```
아래 두 스케치 중 하나를 Arduino에 업로드하세요.
* **간단한 제어:** 가장 빠르게 시작할 수 있지만 FPS를 조정하려면 펌웨어를 다시 플래시해야 합니다.
* **시리얼 제어:** 다시 플래시하지 않고도 주파수와 듀티 사이클을 실시간으로 조정할 수 있습니다 (장치의 전원이 꺼지면 설정이 초기화됩니다).
```cpp theme={null}
#include
// Pin configuration
int pin = 9; // Pin
int value = 127; // Initial value for the PWM duty cycle
// SET FREQUENCY HERE
float frequency = 60; // Initial frequency in Hz
void setup()
{
// Initialize all timers except for timer0 to save timekeeping tasks
InitTimersSafe();
// Set the initial PWM frequency and duty cycle
if (SetPinFrequencySafe(pin, frequency))
{
pwmWrite(pin, value);
Serial.println("PWM frequency and initial duty cycle set.");
}
else
{
Serial.println("Failed to set frequency.");
}
}
```
```cpp theme={null}
#include
// Pin configuration
int pin = 9; // Pin
int value = 127; // Initial value for the PWM duty cycle
float frequency = 60; // Initial frequency in Hz
void setup()
{
Serial.begin(9600);
// Initialize all timers except for timer0 to save timekeeping tasks
InitTimersSafe();
// Set the initial PWM frequency and duty cycle
if (SetPinFrequencySafe(pin, frequency))
{
pwmWrite(pin, value);
Serial.println("PWM frequency and initial duty cycle set.");
}
else
{
Serial.println("Failed to set frequency.");
}
}
void loop()
{
if (Serial.available())
{
// Read frequency and duty cycle values over Serial
String inputString = Serial.readStringUntil('\n');
inputString.trim();
int freqDutySplitIndex = inputString.indexOf(',');
if (freqDutySplitIndex != -1)
{
String freqStr = inputString.substring(0, freqDutySplitIndex);
String dutyStr = inputString.substring(freqDutySplitIndex + 1);
// Parse floats
float newFrequency = freqStr.toFloat();
int newDutyCycle = dutyStr.toInt();
// Validate frequency range
if (newFrequency >= 1 && newFrequency <= 2000000)
{
// Set the PWM frequency and apply duty cycle
if (SetPinFrequencySafe(pin, newFrequency))
{
value = map(constrain(newDutyCycle, 0, 100), 0, 100, 0, 255);
pwmWrite(pin, value);
Serial.print("Set frequency to: ");
Serial.print(newFrequency);
Serial.print(" Hz, duty cycle to: ");
Serial.print(newDutyCycle);
Serial.println("%");
}
else
{
Serial.println("Failed to set new frequency.");
}
}
else
{
Serial.println("Invalid frequency value.");
}
}
else
{
Serial.println("Invalid input format. Use frequency,dutycycle (e.g., 60,50).");
}
}
}
```
이 코드를 사용하면 즉시 PWM 신호를 수정할 수 있습니다. 시리얼 모니터를 `9600` 보드레이트로 열고 `{FREQUENCY},{DUTY_CYCLE}` 형식으로 명령을 보내세요 (예: 60Hz, 50% 듀티 사이클의 경우 `60,50`).
***
## 동기화된 비디오 Python 라이브러리 (Linux)
곧 출시될 SDK 외에도, 현재 카메라 설정에서 동기화된 프레임을 가져오는 간단한 Python 프로세스를 제공합니다. *(참고: 향후 완전한 기능을 갖춘 SDK로 대체될 수 있습니다.)*
사용자 정의 Linux Python 라이브러리를 설치하고 사용하려면 GitHub 가이드를 따르세요.
***
## 동기화된 스티칭 비디오
GStreamer를 사용하여 두 비디오 피드를 동기화하고 스티칭한 다음, 다른 프로그램에서 사용할 가상 장치를 만드는 방법을 다룹니다.
다음 명령을 사용하여 필요한 종속성을 설치하세요:
```bash theme={null}
sudo apt install -y libx264-dev libjpeg-dev \
libglib2.0-dev libgstreamer1.0-dev libgstreamer-plugins-base1.0-dev \
gstreamer1.0-tools gstreamer1.0-x gstreamer1.0-plugins-base gstreamer1.0-plugins-good \
gstreamer1.0-plugins-bad gstreamer1.0-libav libgstreamer-plugins-bad1.0-dev \
gstreamer1.0-plugins-ugly gstreamer1.0-gl \
v4l-utils
```
다음 명령을 실행하여 연결된 카메라를 찾으세요:
```bash theme={null}
v4l2-ctl --list-devices
```
**예시 출력:**
```text theme={null}
stellarHD Leader: stellarHD Lea (usb-0000:00:14.0-8.3):
/dev/video0
/dev/video1
/dev/media0
stellarHD Follower: stellarHD F (usb-0000:00:14.0-8.4):
/dev/video2
/dev/video3
/dev/media1
```
사용할 두 카메라의 장치 ID를 식별한 다음, 현재 나열되어 있지 **않은** 장치 ID 번호를 선택하세요.
이 예시에서는 위에 사용되지 않은 `9`를 사용하여 `stellarHD_stitched`라는 가상 장치를 생성합니다. 선택한 사용되지 않는 ID에 맞게 아래 명령의 `9`를 업데이트하세요:
```bash theme={null}
sudo modprobe v4l2loopback video_nr=9 \
card_label=stellarHD_stitched exclusive_caps=1
```
스티칭된 비디오를 생성하고 새 가상 장치로 스트림을 출력하는 파이프라인을 실행하세요:
```bash theme={null}
gst-launch-1.0 -v \
compositor name=mix \
sink_0::xpos=0 sink_0::ypos=0 sink_0::alpha=1 \
sink_1::xpos=1600 sink_1::ypos=0 sink_1::alpha=1 \
! jpegenc ! jpegdec ! videoconvert ! v4l2sink device=/dev/video9 \
v4l2src device=/dev/video0 ! image/jpeg,width=1600,framerate=60/1 ! jpegdec ! videorate ! mix.sink_0 \
v4l2src device=/dev/video2 ! image/jpeg,width=1600,framerate=60/1 ! jpegdec ! videorate ! mix.sink_1
```
동기화된 스티칭 비디오를 사용하는 동안 이 명령을 계속 실행해야 합니다. 카메라를 더 추가하거나, 해상도/프레임 속도를 변경하거나, 레이아웃을 변경하도록 이 명령을 수정할 수 있습니다.
OpenCV에서 `/dev/video9`를 사용하려면 샘플 코드를 따르세요.
루프백 장치를 안전하게 제거하려면 컴퓨터를 다시 시작하거나 다음 명령 시퀀스를 실행하세요:
**1. 현재 루프백 장치를 사용 중인 프로그램을 식별:**
```bash theme={null}
sudo lsof /dev/video*
```
**2. PID (프로세스 ID) 번호를 사용하여 프로세스 종료:**
```bash theme={null}
sudo kill
```
**3. 루프백 장치 제거:**
```bash theme={null}
sudo modprobe -r v4l2loopback
```