> ## Documentation Index
> Fetch the complete documentation index at: https://docs.dwe.ai/llms.txt
> Use this file to discover all available pages before exploring further.

# stellarHD ファームウェア更新ガイド

> stellarHD カメラを `Leader` モードまたは `Follower` モードに更新する方法のガイドです。

<Note>
  製品の更新が必要かどうかは、[製品更新履歴](/ja/product-update-log)を参照してください。
</Note>

<Warning>
  **間違ったカメラに間違ったファームウェアを適用すると、デバイスが永久に使用不能(文鎮化)になります。注意してお読みください。**
</Warning>

<Info>
  現時点では、ファームウェアのロードは **Windows 10/11** でのみ利用可能です
</Info>

## 必要環境

### Visual C++ 再頒布可能パッケージ

ファームウェアアップデーターツールを実行するには、いくつかの Visual C++ 再頒布可能パッケージをインストールする必要があります。

ダウンロード後は必ずコンピューターを再起動してください。

<AccordionGroup>
  <Accordion title="Ninite からのワンクリックダウンロード">
    <Card title="VCRedist-13/15 ダウンロード" icon="microsoft" href="https://ninite.com/vcredist13-vcredist15-vcredistx13-vcredistx15">
      Ninite を使って、必要なパッケージをすべてワンクリックでインストールできます。
    </Card>
  </Accordion>

  <Accordion title="Microsoft からの手動ダウンロード手順">
    <Steps>
      <Step title="2013 再頒布可能パッケージのダウンロード">
        [2013 Microsoft ダウンロードセンター](https://learn.microsoft.com/en-us/cpp/windows/latest-supported-vc-redist?view=msvc-170#visual-studio-2013-vc-120-no-longer-supported)に移動します。
      </Step>

      <Step>
        Download をクリックし、`vcredist_x86.exe` と `vcredist_x64.exe` の両方を選択します。
      </Step>

      <Step>
        **両方のインストーラー**を実行し、画面の指示に従う必要があります。
      </Step>

      <Step>
        2013 再頒布可能パッケージのインストールに成功しました!次に、最新の再頒布可能パッケージをインストールする必要があります。
      </Step>

      <Step title="2015 再頒布可能パッケージのダウンロード">
        [2015 Microsoft ダウンロードセンター](https://learn.microsoft.com/en-us/cpp/windows/latest-supported-vc-redist?view=msvc-170#visual-studio-2015-vc-140-no-longer-supported)に移動します。
      </Step>

      <Step>
        Download をクリックし、`vc_redist.x86.exe` と `vc_redist.x64.exe` の両方を選択します。
      </Step>

      <Step>
        **両方のインストーラー**を実行し、画面の指示に従う必要があります。
      </Step>

      <Step>
        2015 再頒布可能パッケージのインストールに成功しました!
      </Step>

      <Step>
        コンピューターを再起動します。
      </Step>
    </Steps>
  </Accordion>
</AccordionGroup>

## ファームウェア更新ツールを見つける

[お使いの製品](/ja/stellarHD/specs/stellarHD)のページにアクセスし、ファームウェア更新ユーティリティのダウンロードボタン(通常はページの下部付近)を見つけます。

## ファームウェア更新手順

<Frame>
  <iframe src="https://www.youtube.com/embed/m_ntsJ7IkMk" title="stellarHD Firmware Update Guide" frameborder="0" allow="accelerometer; autoplay; clipboard-write; encrypted-media; gyroscope; picture-in-picture" allowfullscreen />
</Frame>

<Steps>
  <Step>
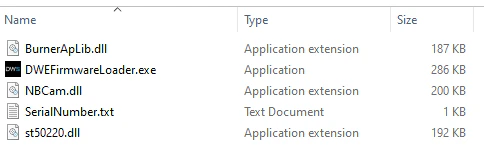
    プログラムが含まれるフォルダーの zip ファイルを展開します。

    <img src="https://mintcdn.com/deepwaterexplorationinc/NrWVR9Qe6FWmBE6d/stellarHD/guides/images/firmware-update/Firmware_Loader_Step_1-1.png?fit=max&auto=format&n=NrWVR9Qe6FWmBE6d&q=85&s=9e5e912d528701ef2fad0b2a965c3c3b" alt="Zip ファイルを展開" width="484" height="24" data-path="stellarHD/guides/images/firmware-update/Firmware_Loader_Step_1-1.png" />

    <img src="https://mintcdn.com/deepwaterexplorationinc/NrWVR9Qe6FWmBE6d/stellarHD/guides/images/firmware-update/Firmware_Loader_Step_1-2.png?fit=max&auto=format&n=NrWVR9Qe6FWmBE6d&q=85&s=fe301e242990f501e2e40cb14171293b" alt="フォルダーの内容" width="484" height="152" data-path="stellarHD/guides/images/firmware-update/Firmware_Loader_Step_1-2.png" />
  </Step>

  <Step>
    すべてのカメラ/Web カメラデバイスを取り外し、**1 台**のカメラのみを接続します。

    ```mermaid theme={null}
    flowchart LR
        camera --> computer
    ```
  </Step>

  <Step>
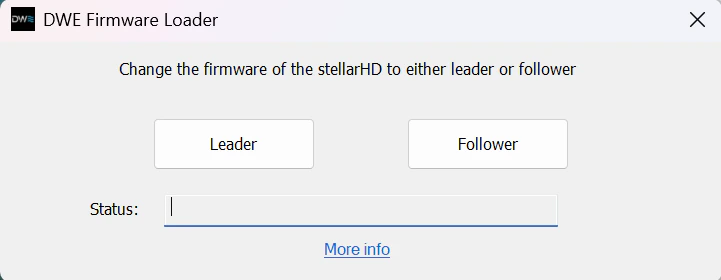
    **続行する前に、カメラを使用しているすべてのアプリケーションが閉じていることを確認してください。**

    `DWEFirmwareLoader.exe` を実行します
    <img src="https://mintcdn.com/deepwaterexplorationinc/NrWVR9Qe6FWmBE6d/stellarHD/guides/images/firmware-update/Firmware_Loader_Step_3_stellar.png?fit=max&auto=format&n=NrWVR9Qe6FWmBE6d&q=85&s=0129f97ef8361cd0d8df0ef51cd58249" alt="DWE Firmware Loader" width="721" height="280" data-path="stellarHD/guides/images/firmware-update/Firmware_Loader_Step_3_stellar.png" />
  </Step>

  <Step>
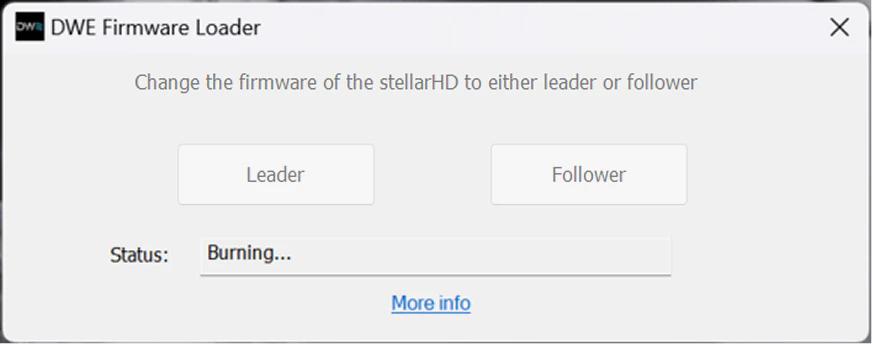
    カメラに適したファームウェアオプションを選択します。

    <Warning>
      更新が完了するまで、アプリケーションを閉じたり、カメラを取り外したり、カメラを使用する可能性のあるアプリケーションを開いたりしないでください。
    </Warning>

    <img src="https://mintcdn.com/deepwaterexplorationinc/NrWVR9Qe6FWmBE6d/stellarHD/guides/images/firmware-update/Firmware_Loader_Step_4_stellar.png?fit=max&auto=format&n=NrWVR9Qe6FWmBE6d&q=85&s=cb5c388c6c096158ff3afddb4f14043c" alt="ファームウェアを更新" width="872" height="344" data-path="stellarHD/guides/images/firmware-update/Firmware_Loader_Step_4_stellar.png" />
  </Step>

  <Step>
    約 1 分後、カメラを使用できるようになります!

    アプリケーションを閉じても問題ありません。

    以下のツールでカメラをテストできます。

    <Card title="オンラインカメラテストユーティリティ" icon="video" href="https://dwe.ai/testcam">
      USB カメラフィードをテストするための便利なツールです。
    </Card>
  </Step>
</Steps>

## トラブルシューティング

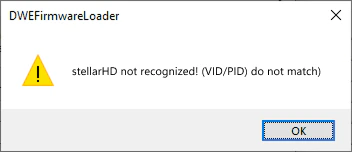
アップグレード中にエラーが表示された場合は、以下のガイドに従ってください。
<AccordionGroup>
  <Accordion title="エラー: stellarHD が認識されません!">
    <img src="https://mintcdn.com/deepwaterexplorationinc/NrWVR9Qe6FWmBE6d/stellarHD/guides/images/firmware-update/Firmware_Loader_Error_Not_Recognized_stellar.png?fit=max&auto=format&n=NrWVR9Qe6FWmBE6d&q=85&s=ec52bcca3e6da84e0b90bfcd8d1c274e" alt="エラーメッセージ" width="352" height="152" data-path="stellarHD/guides/images/firmware-update/Firmware_Loader_Error_Not_Recognized_stellar.png" />

    1. stellarHD のみが接続されていることを確認します
    2. ノート PC の場合、デバイスマネージャーから内蔵 Web カメラを一時的に無効にします。
    3. zip ファイルのすべてが展開されていることを確認してください。dll ファイルはメインの exe と同じフォルダーディレクトリにある必要があります。
  </Accordion>

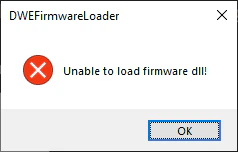
  <Accordion title="エラー: ファームウェア dll をロードできません!">
    <img src="https://mintcdn.com/deepwaterexplorationinc/NrWVR9Qe6FWmBE6d/stellarHD/guides/images/firmware-update/Firmware_Loader_Error_No_dll.png?fit=max&auto=format&n=NrWVR9Qe6FWmBE6d&q=85&s=3ce46dc64c06ef3041168fb352722d0f" alt="エラーメッセージ" width="238" height="152" data-path="stellarHD/guides/images/firmware-update/Firmware_Loader_Error_No_dll.png" />

    1. zip ファイルのすべてが展開されていることを確認してください。dll ファイルはメインの exe と同じフォルダーディレクトリにある必要があります。
  </Accordion>
</AccordionGroup>