> ## Documentation Index
> Fetch the complete documentation index at: https://docs.dwe.ai/llms.txt
> Use this file to discover all available pages before exploring further.

# Guide de configuration réseau du bureau

> Ce guide vous aide à établir une connexion directe entre votre véhicule/système et votre ordinateur portable/PC ou autre ordinateur de bureau.

<Note>
  Assurez-vous de connecter directement votre véhicule/système à un port Ethernet de votre
  ordinateur portable/PC.
</Note>

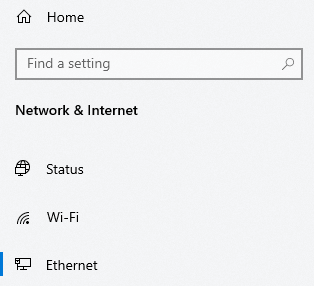
## Configurer l'Ethernet de l'appareil

Cette étape est nécessaire pour définir l'IP de votre appareil dans le réseau local fourni par le Raspberry Pi via Ethernet.

<Tabs>
  <Tab title="Windows">
    <Steps>
      <Step>
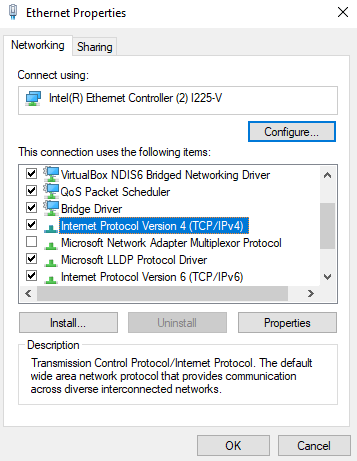
        Sous **Paramètres/Réseau et Ethernet**, sélectionnez **Ethernet**

        <Frame>
          <img src="https://mintcdn.com/deepwaterexplorationinc/PpwtoMTlxduUAF0D/dwe-os/guides/images/desktop-network-setup/windows/network.png?fit=max&auto=format&n=PpwtoMTlxduUAF0D&q=85&s=1c119ac65c85a2620358740ccda88908" width="314" height="286" data-path="dwe-os/guides/images/desktop-network-setup/windows/network.png" />
        </Frame>
      </Step>

      <Step>
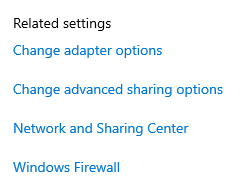
        Sous **Paramètres associés** à droite, sélectionnez `Modifier les options d'adaptateur`

        <Frame>
          <img src="https://mintcdn.com/deepwaterexplorationinc/PpwtoMTlxduUAF0D/dwe-os/guides/images/desktop-network-setup/windows/adapter_options.png?fit=max&auto=format&n=PpwtoMTlxduUAF0D&q=85&s=9ad240fbe4d5895950e5c4d3d268ce6a" width="251" height="192" data-path="dwe-os/guides/images/desktop-network-setup/windows/adapter_options.png" />
        </Frame>
      </Step>

      <Step>
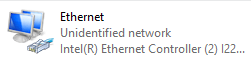
        Trouvez l'adaptateur nommé `Ethernet` avec le sous-titre `Réseau non identifié`

        <Frame>
          <img src="https://mintcdn.com/deepwaterexplorationinc/PpwtoMTlxduUAF0D/dwe-os/guides/images/desktop-network-setup/windows/adapter.png?fit=max&auto=format&n=PpwtoMTlxduUAF0D&q=85&s=260cdb758ce555e30fe0916a757b1154" width="251" height="63" data-path="dwe-os/guides/images/desktop-network-setup/windows/adapter.png" />
        </Frame>
      </Step>

      <Step>
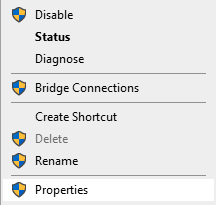
        Cliquez avec le bouton droit sur l'adaptateur et sélectionnez `Propriétés`

        <Frame>
          <img src="https://mintcdn.com/deepwaterexplorationinc/PpwtoMTlxduUAF0D/dwe-os/guides/images/desktop-network-setup/windows/right-click-adapter.png?fit=max&auto=format&n=PpwtoMTlxduUAF0D&q=85&s=d7d922cd43863c3dca561582f2f55c8a" width="216" height="205" data-path="dwe-os/guides/images/desktop-network-setup/windows/right-click-adapter.png" />
        </Frame>
      </Step>

      <Step>
        Repérez `Protocole Internet version 4 (TCP/IPv4)` et sélectionnez `Propriétés`

        <Frame>
          <img src="https://mintcdn.com/deepwaterexplorationinc/PpwtoMTlxduUAF0D/dwe-os/guides/images/desktop-network-setup/windows/properties.png?fit=max&auto=format&n=PpwtoMTlxduUAF0D&q=85&s=2fb8e86ec8dbe3d7f46b780e9b0666e2" width="357" height="461" data-path="dwe-os/guides/images/desktop-network-setup/windows/properties.png" />
        </Frame>
      </Step>

      <Step>
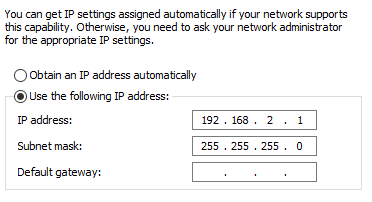
        Modifiez le menu pour qu'il ressemble à ce qui suit :

        <Frame>
          <img src="https://mintcdn.com/deepwaterexplorationinc/PpwtoMTlxduUAF0D/dwe-os/guides/images/desktop-network-setup/windows/settings.png?fit=max&auto=format&n=PpwtoMTlxduUAF0D&q=85&s=82513e9541fc15b2567a8d63d0e001c4" width="372" height="202" data-path="dwe-os/guides/images/desktop-network-setup/windows/settings.png" />
        </Frame>
      </Step>

      <Step>
        Cliquez sur `OK` pour appliquer les modifications. Cela devrait maintenant permettre à votre Pi d'identifier votre appareil Windows sous la bonne adresse IP pour y diffuser des données.
      </Step>
    </Steps>
  </Tab>

  <Tab title="Linux">
    <Note>
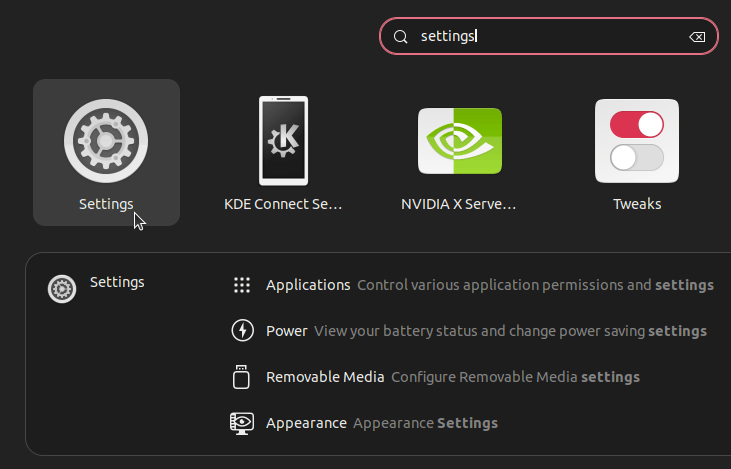
      Ces instructions s'appliquent à `Ubuntu 22.04`, mais peuvent être généralisées à la plupart des distributions Linux.
    </Note>

    <Steps>
      <Step>
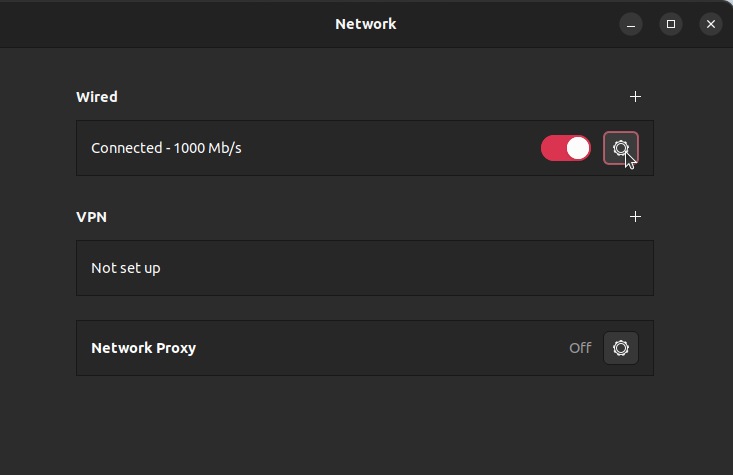
        Recherchez **Paramètres**.

        <Frame>
          <img width="500px" src="https://mintcdn.com/deepwaterexplorationinc/PpwtoMTlxduUAF0D/dwe-os/guides/images/desktop-network-setup/ubuntu/settings.png?fit=max&auto=format&n=PpwtoMTlxduUAF0D&q=85&s=c59cebe7f13f002b78cc980e5d6eeda1" data-path="dwe-os/guides/images/desktop-network-setup/ubuntu/settings.png" />
        </Frame>
      </Step>

      <Step>
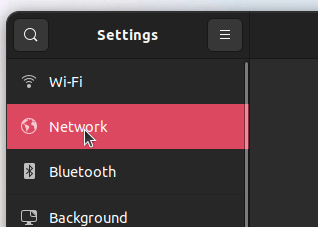
        Sélectionnez **Réseau**.

        <Frame>
          <img src="https://mintcdn.com/deepwaterexplorationinc/PpwtoMTlxduUAF0D/dwe-os/guides/images/desktop-network-setup/ubuntu/network.png?fit=max&auto=format&n=PpwtoMTlxduUAF0D&q=85&s=58e3bba2b494d24d67fb2bd0a97aad00" width="318" height="227" data-path="dwe-os/guides/images/desktop-network-setup/ubuntu/network.png" />
        </Frame>
      </Step>

      <Step>
        Sous **Filaire**, sélectionnez l'icône paramètres/engrenage.

        <Frame>
          <img width="500px" src="https://mintcdn.com/deepwaterexplorationinc/PpwtoMTlxduUAF0D/dwe-os/guides/images/desktop-network-setup/ubuntu/wired.png?fit=max&auto=format&n=PpwtoMTlxduUAF0D&q=85&s=ec6da17db99bba5bc3c4b9a1360f863f" data-path="dwe-os/guides/images/desktop-network-setup/ubuntu/wired.png" />
        </Frame>
      </Step>

      <Step>
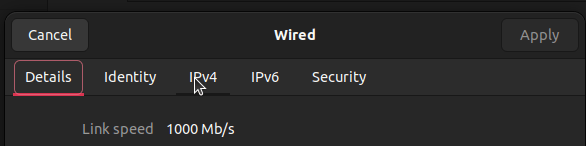
        Sélectionnez l'onglet **IPv4** en haut.

        <Frame>
          <img src="https://mintcdn.com/deepwaterexplorationinc/PpwtoMTlxduUAF0D/dwe-os/guides/images/desktop-network-setup/ubuntu/ipv4_tab.png?fit=max&auto=format&n=PpwtoMTlxduUAF0D&q=85&s=8c1323132e22fcedc2094b1919febac4" width="586" height="146" data-path="dwe-os/guides/images/desktop-network-setup/ubuntu/ipv4_tab.png" />
        </Frame>
      </Step>

      <Step>
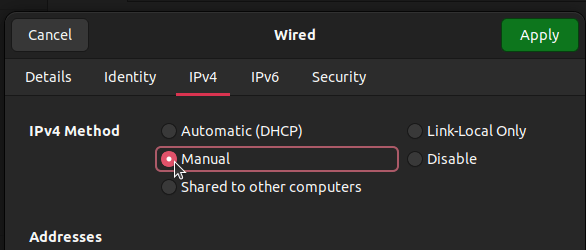
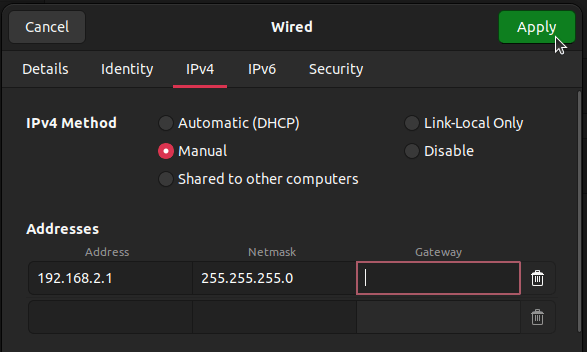
        Sous **Méthode IPv4**, sélectionnez **Manuel**.

        <Frame>
          <img src="https://mintcdn.com/deepwaterexplorationinc/PpwtoMTlxduUAF0D/dwe-os/guides/images/desktop-network-setup/ubuntu/manual.png?fit=max&auto=format&n=PpwtoMTlxduUAF0D&q=85&s=2367cda5fc80bb25c613f2296cc2fe1b" width="586" height="250" data-path="dwe-os/guides/images/desktop-network-setup/ubuntu/manual.png" />
        </Frame>
      </Step>

      <Step>
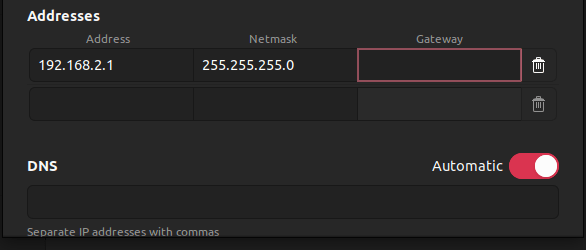
        Sous **Adresses**, modifiez vos paramètres comme suit :

        <Frame>
          <img src="https://mintcdn.com/deepwaterexplorationinc/PpwtoMTlxduUAF0D/dwe-os/guides/images/desktop-network-setup/ubuntu/ip_settings.png?fit=max&auto=format&n=PpwtoMTlxduUAF0D&q=85&s=69292f4c1266453f701ea2ba2407397b" width="586" height="250" data-path="dwe-os/guides/images/desktop-network-setup/ubuntu/ip_settings.png" />
        </Frame>
      </Step>

      <Step>
        Cliquez sur **Appliquer**. Cela devrait maintenant permettre à votre Pi d'identifier votre appareil Linux sous la bonne adresse IP.

        <Frame>
          <img src="https://mintcdn.com/deepwaterexplorationinc/PpwtoMTlxduUAF0D/dwe-os/guides/images/desktop-network-setup/ubuntu/apply.png?fit=max&auto=format&n=PpwtoMTlxduUAF0D&q=85&s=55c1f6df9c8b06d3b03c6b34706b01cb" width="587" height="352" data-path="dwe-os/guides/images/desktop-network-setup/ubuntu/apply.png" />
        </Frame>
      </Step>
    </Steps>
  </Tab>
</Tabs>

<div onClick={() => window.history.back()} onMouseEnter={(e) => e.currentTarget.firstChild.style.borderColor = '#46bae7'} onMouseLeave={(e) => e.currentTarget.firstChild.style.borderColor = ''} style={{ cursor: 'pointer', display: 'contents' }}>
  <Card title="Retourner à la page précédente" icon="u-turn-down-left" iconType="duotone">
    Ce bouton vous ramènera à la page sur laquelle vous étiez précédemment !
  </Card>
</div>
