> ## Documentation Index
> Fetch the complete documentation index at: https://docs.dwe.ai/llms.txt
> Use this file to discover all available pages before exploring further.
# explore3D Quickstart Guide
> Go from an unboxed explore3D to a live depth map and point cloud. This guide sequences the setup across the explore3D, the SVC Pro, and DeepWater Desktop.
## Overview
The explore3D is a factory-aligned stereo camera pair on a 100mm baseline, using global shutter sensors that are frame-synchronized to each other.
The camera captures the imagery, but it does not compute depth on its own. Depth maps and point clouds are produced by the **SVC Pro**, and viewed on your desktop in **DeepWater Desktop**. Setting up an explore3D therefore means setting up all three, in order.
An [SVC Pro](/svc/specs/svc-pro) is required. The explore3D does not stream depth data directly to a desktop computer.
## The explore3D System
Select the kit you received below. Both share the same setup path — the Complete Kit simply adds strobe lighting.
```mermaid theme={null}
flowchart LR
A["explore3D
Stereo Camera Pair"] -->|"2x USB (Cobalt / SubConn)"| B["SVC Pro
Onboard Compute"]
B -->|"Ethernet"| C["DeepWater Desktop
Visualization"]
```
```mermaid theme={null}
flowchart LR
A["explore3D
Stereo Camera Pair"] -->|"2x USB (Cobalt / SubConn)"| B["SVC Pro
Onboard Compute"]
L2["aquaLUX MAX
Light 2"] -->|"Daisy chain"| L1["aquaLUX MAX
Light 1"]
L1 -->|"1x Light Cable"| B
B -->|"Ethernet"| C["DeepWater Desktop
Visualization"]
```
The two aquaLUX MAX lights daisy chain to each other, so only a single cable runs from the light pair back to the SVC Pro.
The SVC Pro manages strobe timing and power for the lights, synchronizing each pulse to the camera's exposure window. For brightness and exposure tuning, see the [aquaLUX MAX Operations Guide](/lighting/guides/aquaLUX-max-operations).
Captures synchronized stereo imagery.
Runs the stereo algorithm and generates depth.
Displays rectified images, disparity maps, and point clouds.
## Before You Begin
Have the following on hand:
* Your explore3D and its two camera cables
* An SVC Pro, with a 9-50V power source and an Ethernet connection to your desktop computer
* A Windows or Linux desktop computer to run DeepWater Desktop
* **Complete Kit only:** your two aquaLUX MAX lights and their daisy chain cable
## Setup
DeepWater Desktop is not a public download. Check your email first — if you have already purchased an explore3D, our team may have sent you the download links directly.
If you have not received them, reach out through our contact page and our team will send you a link.
Get direct help from our team and request the latest DeepWater Desktop build.
Ask for the latest DeepWater Desktop build and, if needed, an SVC Pro updater. Let us know which operating system you are on so we can send the matching build.
You can continue with the hardware setup below while you wait for a response.
Each camera in the pair has its own cable. Connect each one to a **separate camera port** on the SVC Pro.
Select your connector variant to find the camera ports.
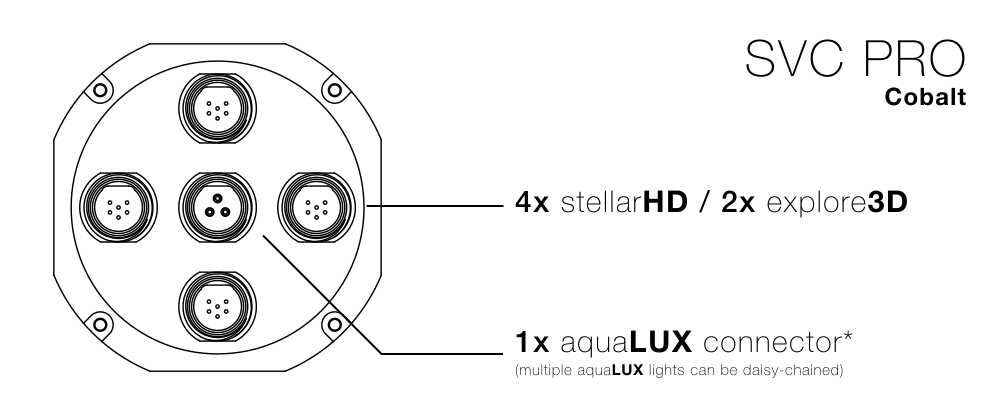
 For the full connector reference, see the [SVC Pro I/O connectors](/svc/specs/svc-pro#i%2Fo-connectors).
**Complete Kit:** daisy chain your two aquaLUX MAX lights together, then run the single remaining light cable to a **light port** on Side 1.
Provide 9-50V to the SVC Pro, connect its Ethernet output to your computer, and configure your desktop networking so you can reach dweOS Pro at `http://192.168.2.2`.
For the full connector reference, see the [SVC Pro I/O connectors](/svc/specs/svc-pro#i%2Fo-connectors).
**Complete Kit:** daisy chain your two aquaLUX MAX lights together, then run the single remaining light cable to a **light port** on Side 1.
Provide 9-50V to the SVC Pro, connect its Ethernet output to your computer, and configure your desktop networking so you can reach dweOS Pro at `http://192.168.2.2`.
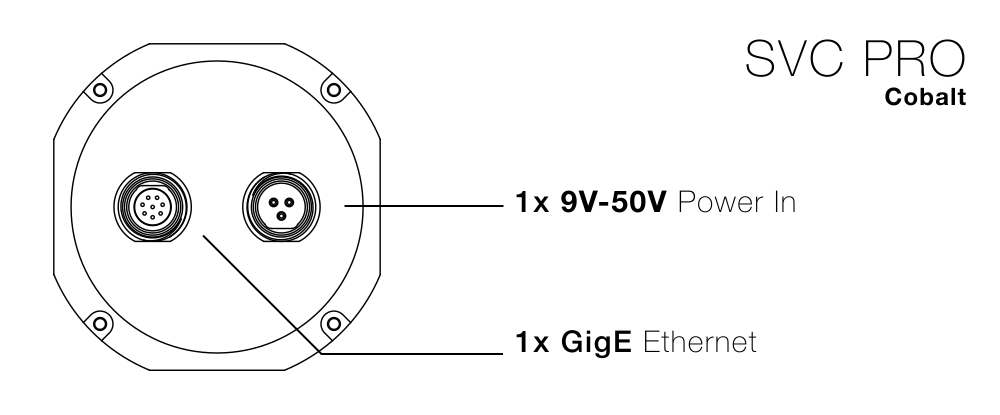
 Power, Ethernet, and desktop network configuration. Return here once you can load dweOS Pro in your browser.
Open the DeepWater Desktop build you received in Step 1, connect it to your SVC Pro at `192.168.2.2`, and add a stream.
Connecting to the SVC Pro, choosing a depth mode, and assigning your left and right camera inputs.
The cameras do not store their positional data, so you assign the left and right inputs manually when configuring the stream. Getting these backwards is the most common cause of a bad depth map.
Your explore3D is now streaming through the SVC Pro into DeepWater Desktop.
You should see rectified images, a disparity map, and a live point cloud in the main interface.
## Other Resources
Optics, sensor, frame-sync, pinouts, and CAD files.
Configure hardware, streaming, and sensor settings.
Track camera movement and build a dense point cloud from the image stream.
Capture DWVO recordings for playback and later reprocessing.
## Troubleshooting
### Only one camera appears in dweOS Pro
Both cables must be connected to camera ports on the SVC Pro, and any existing video stream on the follower camera should be stopped before pairing. See the [Synchronized Streaming Guide](/dwe-os/pro/guides/synchronized-streaming).
### You cannot reach dweOS Pro at `192.168.2.2`
This is almost always a desktop networking issue rather than a fault with the SVC Pro. Work through the [Desktop Networking guide](/dwe-os/guides/desktop-network-setup). If you configured your SVC Pro for **Dynamic IP (DHCP)**, use the address listed in your router instead.
### The depth map looks inverted or incorrect
Stop the stream and confirm your left and right camera inputs were assigned in the correct order when configuring the stream in DeepWater Desktop.
Power, Ethernet, and desktop network configuration. Return here once you can load dweOS Pro in your browser.
Open the DeepWater Desktop build you received in Step 1, connect it to your SVC Pro at `192.168.2.2`, and add a stream.
Connecting to the SVC Pro, choosing a depth mode, and assigning your left and right camera inputs.
The cameras do not store their positional data, so you assign the left and right inputs manually when configuring the stream. Getting these backwards is the most common cause of a bad depth map.
Your explore3D is now streaming through the SVC Pro into DeepWater Desktop.
You should see rectified images, a disparity map, and a live point cloud in the main interface.
## Other Resources
Optics, sensor, frame-sync, pinouts, and CAD files.
Configure hardware, streaming, and sensor settings.
Track camera movement and build a dense point cloud from the image stream.
Capture DWVO recordings for playback and later reprocessing.
## Troubleshooting
### Only one camera appears in dweOS Pro
Both cables must be connected to camera ports on the SVC Pro, and any existing video stream on the follower camera should be stopped before pairing. See the [Synchronized Streaming Guide](/dwe-os/pro/guides/synchronized-streaming).
### You cannot reach dweOS Pro at `192.168.2.2`
This is almost always a desktop networking issue rather than a fault with the SVC Pro. Work through the [Desktop Networking guide](/dwe-os/guides/desktop-network-setup). If you configured your SVC Pro for **Dynamic IP (DHCP)**, use the address listed in your router instead.
### The depth map looks inverted or incorrect
Stop the stream and confirm your left and right camera inputs were assigned in the correct order when configuring the stream in DeepWater Desktop.