> ## Documentation Index
> Fetch the complete documentation index at: https://docs.dwe.ai/llms.txt
> Use this file to discover all available pages before exploring further.
# dweOS to GStreamer
> This guide is to help you setup streaming from dweOS with GStreamer.
dweOS does not officially support streaming with GStreamer. The following steps are for Linux and Windows only.
NOTE: Stream quality may suffer as a result.
GStreamer can be very complex/elaborate, even to set up one video stream. Many of the Quality of Life features like multiple streams and live recordings are much simpler and come with a user interface on [Discovery](https://dwe.ai/products/discovery)
After following the dweOS setup, continue to next steps.
Note down the port(s) being streamed to.
Within the terminal, run:
```sh theme={null}
sudo apt update
```
Then run the following to install GStreamer:
```sh theme={null}
sudo apt install gstreamer1.0-plugins-base gstreamer1.0-plugins-good gstreamer1.0-plugins-ugly gstreamer1.0-libav gstreamer1.0-tools
```
Click here to download GStreamer for Desktop on your Laptop/PC.
Make sure to download the MinGW version, and install both runtime and development.
When in doubt, install the 64-bit version, as this is more common.
GStreamer would automatically install in the D drive if you have more than one drive on your PC. You can change it to the C drive when you do custom installation.
If yu instal it on the D drive, just keep note of that when you set up your environment variables below.
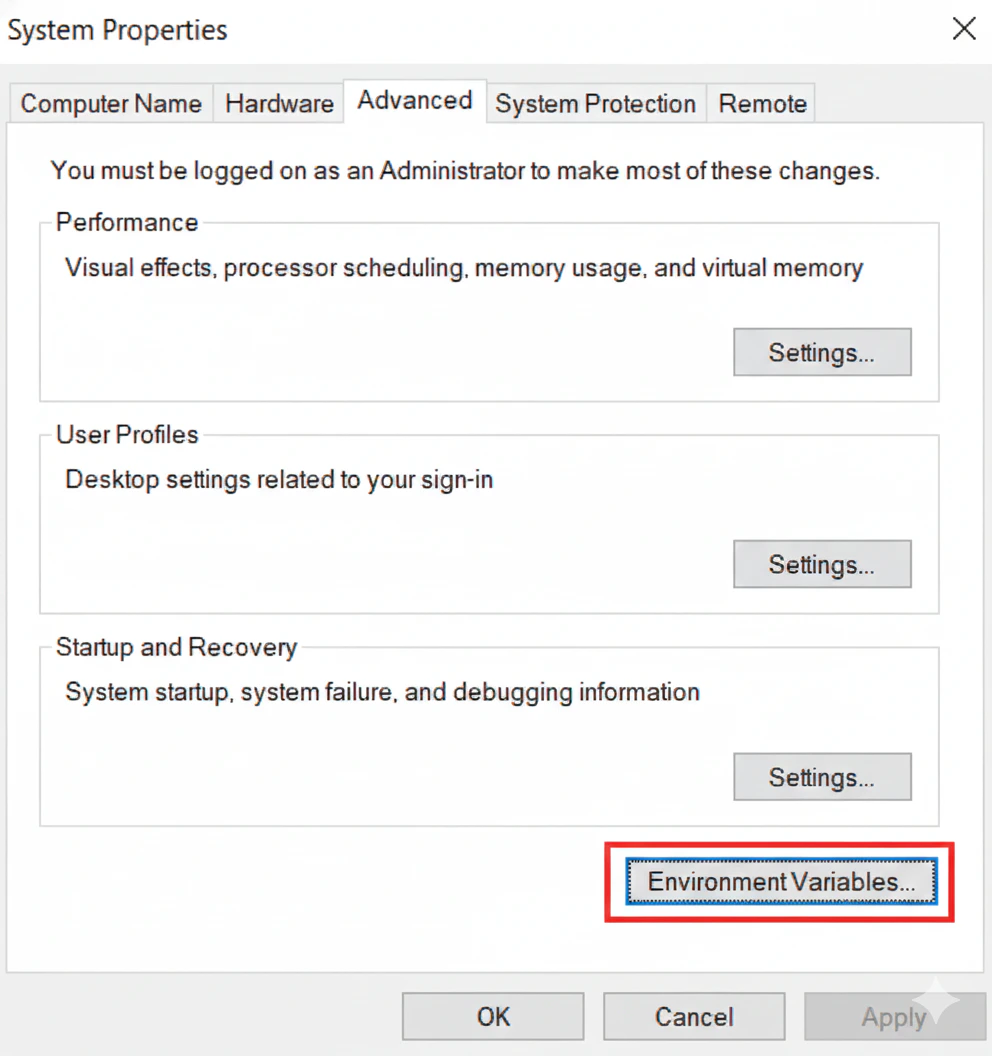
To get to Environment Variables, press `Win + R`
Type:
```
SystemPropertiesAdvanced
```
and press `Enter`
Click `Environment Variables...`
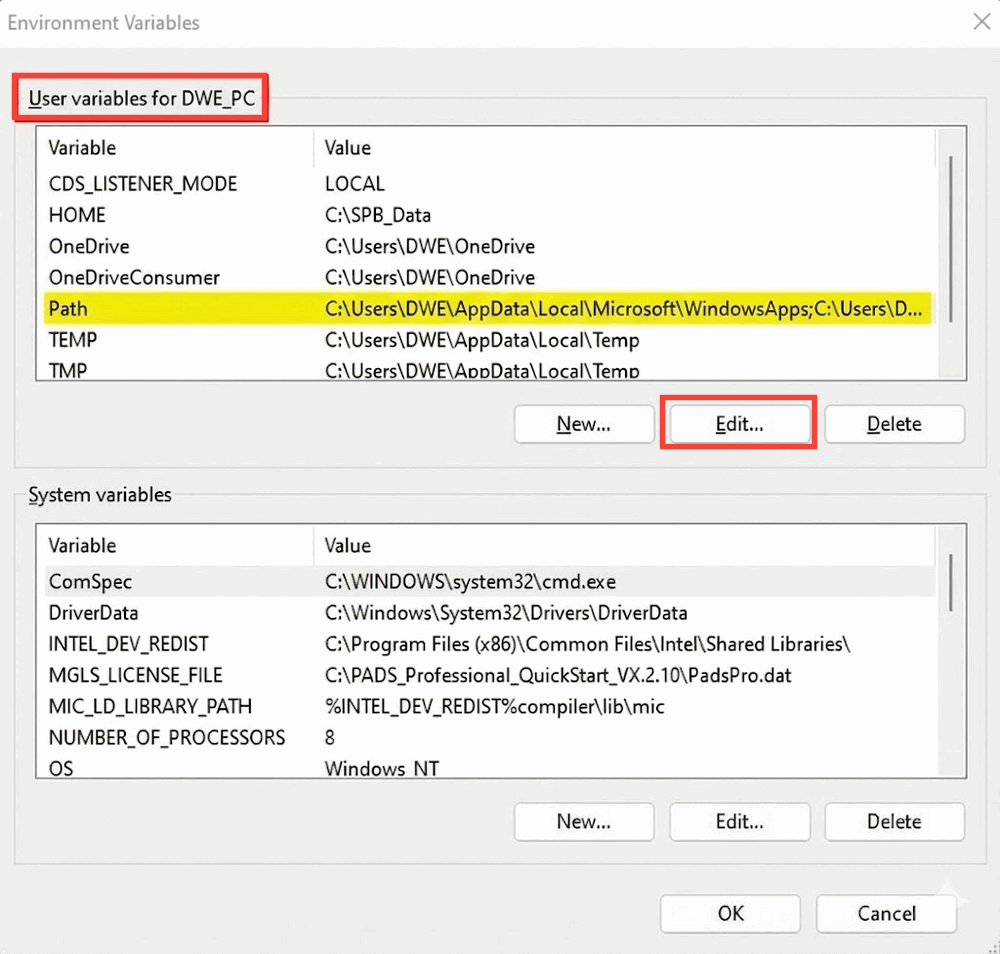
 Highlight the variable `Path` under `User variables` by clicking on it and then click `Edit…` under the `User variables` box.
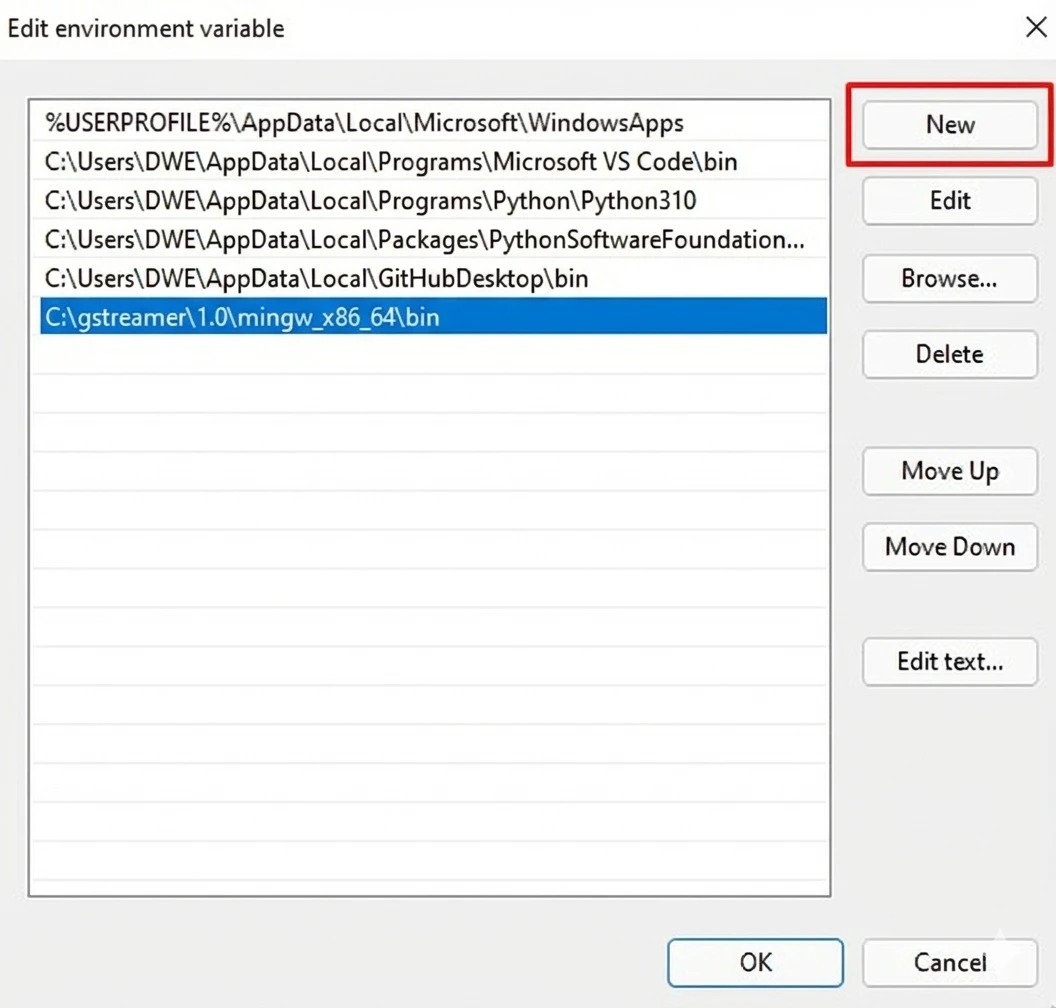
 A new window should pop up and you want to click on `New` and add a path to your bin folder to the list. In this case, it’s:
```
C:\gstreamer\1.0\mingw_x86_64\bin
```
The path to your bin may vary and can be found from where you installed GStreamer in previous steps.
A new window should pop up and you want to click on `New` and add a path to your bin folder to the list. In this case, it’s:
```
C:\gstreamer\1.0\mingw_x86_64\bin
```
The path to your bin may vary and can be found from where you installed GStreamer in previous steps.
 After that, click `OK` on both windows and you should be ready to go!
You should now have GStreamer setup and ready for next steps!
To verify the GStreamer setup, open `CMD` and run the following:
```sh theme={null}
gst-launch-1.0 --version
```
This should result in an output like:
```sh theme={null}
gst-launch-1.0 version 1.16.2
GStreamer 1.16.2
https://launchpad.net/distros/ubuntu/+source/gstreamer1.0
```
In order to link up connected devices video streams, you will first configure dweOS.
First identify your laptop / desktop IP address, which we will be populating into the dweOS software.
This can be done by running the following:
```sh theme={null}
ip addr
```
You will be met with many addresses, look through them, specifically addresses following the text:
`inet`.
It will most likely be in the format `192.168.x.xx`
You will want to replace the collected IP in dweOS under IP address, and take note of the port you are streaming to. (Default 5600)
Remember to create the streaming endpoint with the `(+)` button once the fields are filled!
In this example the collected IP is 192.168.5.55, and the port is 5600
After that, click `OK` on both windows and you should be ready to go!
You should now have GStreamer setup and ready for next steps!
To verify the GStreamer setup, open `CMD` and run the following:
```sh theme={null}
gst-launch-1.0 --version
```
This should result in an output like:
```sh theme={null}
gst-launch-1.0 version 1.16.2
GStreamer 1.16.2
https://launchpad.net/distros/ubuntu/+source/gstreamer1.0
```
In order to link up connected devices video streams, you will first configure dweOS.
First identify your laptop / desktop IP address, which we will be populating into the dweOS software.
This can be done by running the following:
```sh theme={null}
ip addr
```
You will be met with many addresses, look through them, specifically addresses following the text:
`inet`.
It will most likely be in the format `192.168.x.xx`
You will want to replace the collected IP in dweOS under IP address, and take note of the port you are streaming to. (Default 5600)
Remember to create the streaming endpoint with the `(+)` button once the fields are filled!
In this example the collected IP is 192.168.5.55, and the port is 5600
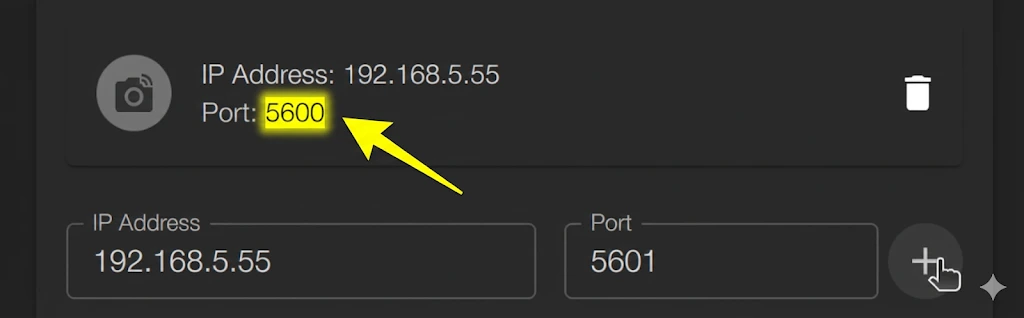 The Port field being set to 5601 is automatic with the program, the only endpoint being streamed to have the camera icon next to them and a trash button to delete them.
The format of GStreamer is as follows:
```sh theme={null}
gst-launch-1.0 [FLAGS] [SOURCE] ! [FILTER] ! [SINK]
```
With the port in mind, there are a few parameters for the GStreamer command to be aware of.
**Vital Flags**:
* `-v`(Verbose): Prints stream info so you can see what resolution.format is being negotiated between elements.
* `-e`(EOS - End of Stream): Crucial for recording. If you press Ctrl+C without this flag, your file might be corrupted (missing headers). This flag forces a clean shutdown.
* `--help-all`: Lists every single element available on your system.
**Sources (Input)**:
* `videotestsrc`: Generates a test pattern (color bars, static, etc.).
* *Param*: `pattern=smpte` (or `snow`, `ball`, etc.)
* `autovideosrc` / `v4l2src`: Your webcam (Linux).
* *Param*: `device=/dev/video0`
* `filesrc`: Reads a local file.
* *Param*: `location=./video.mp4`
* `udpsrc`: Receives data over the network via UDP.
* *Param*: `port=5600` (The port to listen on).
* *Param*: `caps="..."` (Essential! Tells GStreamer what the raw bytes actually are).
* *Param*: `buffer-size=524288` (Increases buffer to prevent packet loss on high-res streams).
* Standard buffer sizes for H264 is `96` and MJPEG is `26`
**Sinks (Output)**
* `autovideosink`: Opens a window and plays the video.
* `fakesink`: Discards data (useful for testing if a pipeline runs without errors).
* `filesink`: Writes to a file.
* *Param*: `location=output.mp4`
* `udpsink`: Streams over the network.
**Essentials (Filters/Converters)**
* `videoconvert`: Converts colorspaces (e.g., from YUV to RGB). If you get a "could not link" error, throw this in the middle.
* `videoscale`: Resizes video.
* `capsfilter`: Forces a specific format. Syntax: `video/x-raw,width=1920,height=1080`.
* `rtp[format]depay`: Depayloader. unwraps RTP network packets to reveal the stream inside.
* *Examples*: `rtpjpegdepay` (for MJPEG), `rtph264depay` (for H.264).
* `[format]dec`: Decoder. Decompresses video into raw pixels for display.
* *Examples*: `jpegdec`, `avdec_h264`.
Here are a couple example lines to test your GStreamer:
**Test Pattern**
```sh theme={null}
gst-launch-1.0 -v videotestsrc ! videoconvert ! autovideosink
```
**Webcam Display (If available)**
```sh theme={null}
gst-launch-1.0 -v v4l2src ! videoconvert ! autovideosink
```
**Webcam Force 720p 30fps**
```sh theme={null}
gst-launch-1.0 -v v4l2src ! image/jpeg,width=1280,height=720,framerate=30/1 ! jpegdec ! videoconvert ! autovideosink
```
For higher resolutions, the video output is usually compressed MJPEG.
`image/jpeg` accept the compressed format from the camera.
`jpegdec` adds a decoder to turn that JPEG stream back into Raw Video so the window can display it.
**Record Webcam**
```sh theme={null}
gst-launch-1.0 -e v4l2src ! videoconvert ! x264enc ! mp4mux ! filesink location=test.mp4
```
This will record in the background, to finish the clip, press `Ctrl + C`, and it will be in the directory currently.
In this case the file is named `test.mp4`, which we can check for existence with `ls -lh test.mp4`
With an understanding of GStreamer commands, we can begin setting up the video stream specifically with dweOS.
Remember to set your own IP as the IP in the streaming endpoint!
Depending on the video codec (MJPEC / H264) specified in dweOS, run either of the following:
**MJPEG**
```sh theme={null}
gst-launch-1.0 udpsrc port=5600 caps="application/x-rtp, encoding-name=JPEG, payload=26" ! rtpjpegdepay ! jpegdec ! autovideosink
```
**H264**
```sh theme={null}
gst-launch-1.0 udpsrc port=5600 caps="application/x-rtp, encoding-name=H264, payload=96" ! rtph264depay ! avdec_h264 ! autovideosink
```
Remember to replace the port number in the command line with the port being streamed to!
You should now have a live stream from you camera in a window!
To record a stream, once again the video codec matters!
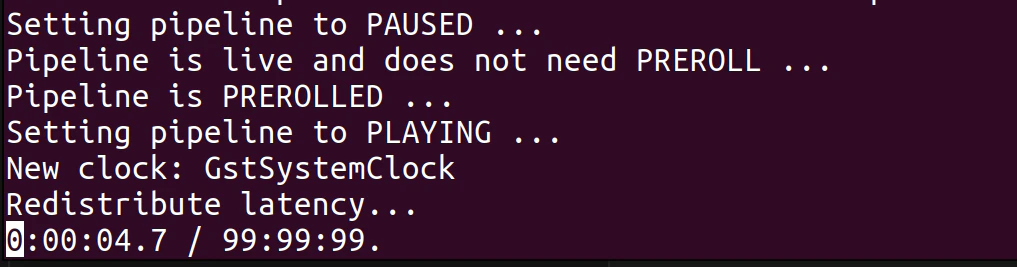
You will know a stream is being recorded should your terminal contain text similar to this:
The Port field being set to 5601 is automatic with the program, the only endpoint being streamed to have the camera icon next to them and a trash button to delete them.
The format of GStreamer is as follows:
```sh theme={null}
gst-launch-1.0 [FLAGS] [SOURCE] ! [FILTER] ! [SINK]
```
With the port in mind, there are a few parameters for the GStreamer command to be aware of.
**Vital Flags**:
* `-v`(Verbose): Prints stream info so you can see what resolution.format is being negotiated between elements.
* `-e`(EOS - End of Stream): Crucial for recording. If you press Ctrl+C without this flag, your file might be corrupted (missing headers). This flag forces a clean shutdown.
* `--help-all`: Lists every single element available on your system.
**Sources (Input)**:
* `videotestsrc`: Generates a test pattern (color bars, static, etc.).
* *Param*: `pattern=smpte` (or `snow`, `ball`, etc.)
* `autovideosrc` / `v4l2src`: Your webcam (Linux).
* *Param*: `device=/dev/video0`
* `filesrc`: Reads a local file.
* *Param*: `location=./video.mp4`
* `udpsrc`: Receives data over the network via UDP.
* *Param*: `port=5600` (The port to listen on).
* *Param*: `caps="..."` (Essential! Tells GStreamer what the raw bytes actually are).
* *Param*: `buffer-size=524288` (Increases buffer to prevent packet loss on high-res streams).
* Standard buffer sizes for H264 is `96` and MJPEG is `26`
**Sinks (Output)**
* `autovideosink`: Opens a window and plays the video.
* `fakesink`: Discards data (useful for testing if a pipeline runs without errors).
* `filesink`: Writes to a file.
* *Param*: `location=output.mp4`
* `udpsink`: Streams over the network.
**Essentials (Filters/Converters)**
* `videoconvert`: Converts colorspaces (e.g., from YUV to RGB). If you get a "could not link" error, throw this in the middle.
* `videoscale`: Resizes video.
* `capsfilter`: Forces a specific format. Syntax: `video/x-raw,width=1920,height=1080`.
* `rtp[format]depay`: Depayloader. unwraps RTP network packets to reveal the stream inside.
* *Examples*: `rtpjpegdepay` (for MJPEG), `rtph264depay` (for H.264).
* `[format]dec`: Decoder. Decompresses video into raw pixels for display.
* *Examples*: `jpegdec`, `avdec_h264`.
Here are a couple example lines to test your GStreamer:
**Test Pattern**
```sh theme={null}
gst-launch-1.0 -v videotestsrc ! videoconvert ! autovideosink
```
**Webcam Display (If available)**
```sh theme={null}
gst-launch-1.0 -v v4l2src ! videoconvert ! autovideosink
```
**Webcam Force 720p 30fps**
```sh theme={null}
gst-launch-1.0 -v v4l2src ! image/jpeg,width=1280,height=720,framerate=30/1 ! jpegdec ! videoconvert ! autovideosink
```
For higher resolutions, the video output is usually compressed MJPEG.
`image/jpeg` accept the compressed format from the camera.
`jpegdec` adds a decoder to turn that JPEG stream back into Raw Video so the window can display it.
**Record Webcam**
```sh theme={null}
gst-launch-1.0 -e v4l2src ! videoconvert ! x264enc ! mp4mux ! filesink location=test.mp4
```
This will record in the background, to finish the clip, press `Ctrl + C`, and it will be in the directory currently.
In this case the file is named `test.mp4`, which we can check for existence with `ls -lh test.mp4`
With an understanding of GStreamer commands, we can begin setting up the video stream specifically with dweOS.
Remember to set your own IP as the IP in the streaming endpoint!
Depending on the video codec (MJPEC / H264) specified in dweOS, run either of the following:
**MJPEG**
```sh theme={null}
gst-launch-1.0 udpsrc port=5600 caps="application/x-rtp, encoding-name=JPEG, payload=26" ! rtpjpegdepay ! jpegdec ! autovideosink
```
**H264**
```sh theme={null}
gst-launch-1.0 udpsrc port=5600 caps="application/x-rtp, encoding-name=H264, payload=96" ! rtph264depay ! avdec_h264 ! autovideosink
```
Remember to replace the port number in the command line with the port being streamed to!
You should now have a live stream from you camera in a window!
To record a stream, once again the video codec matters!
You will know a stream is being recorded should your terminal contain text similar to this:
 **MJPEG**
For MKV
```sh theme={null}
gst-launch-1.0 -e udpsrc port=5600 caps="application/x-rtp, encoding-name=JPEG, payload=26" ! rtpjpegdepay ! jpegparse ! matroskamux ! filesink location=output_mjpeg.mkv
```
The line above is for an MKV format, as AVI is incredibly finicky with GStreamer and requires the output data to be formatted very specifically. While possible, MJPEG to AVI is much simpler in [Discovery](https://dwe.ai/products/discovery), as it is the default output.
**H264**
For MKV
```sh theme={null}
gst-launch-1.0 -e udpsrc port=5600 caps="application/x-rtp, encoding-name=H264, payload=96" ! rtph264depay ! h264parse ! matroskamux ! filesink location=output_h264.mkv
```
For MP4
```sh theme={null}
gst-launch-1.0 -e udpsrc port=5600 caps="application/x-rtp, encoding-name=H264, payload=96" ! rtph264depay ! h264parse ! video/x-h264,stream-format=avc ! mp4mux ! filesink location=video.mp4
```
Wonderful! You should now have the building blocks to set up a stream and recording with GStreamer!
Warning:
With GStreamer, a single camera setup already requires quite a bit of work,
and recording multiple streams at once would also require quite a bit of work
and development.
We recommend [Discovery](https://dwe.ai/products/discovery) should your camera setups become complex.
The all-in-one multimedia solution for subsea network video streams.
**MJPEG**
For MKV
```sh theme={null}
gst-launch-1.0 -e udpsrc port=5600 caps="application/x-rtp, encoding-name=JPEG, payload=26" ! rtpjpegdepay ! jpegparse ! matroskamux ! filesink location=output_mjpeg.mkv
```
The line above is for an MKV format, as AVI is incredibly finicky with GStreamer and requires the output data to be formatted very specifically. While possible, MJPEG to AVI is much simpler in [Discovery](https://dwe.ai/products/discovery), as it is the default output.
**H264**
For MKV
```sh theme={null}
gst-launch-1.0 -e udpsrc port=5600 caps="application/x-rtp, encoding-name=H264, payload=96" ! rtph264depay ! h264parse ! matroskamux ! filesink location=output_h264.mkv
```
For MP4
```sh theme={null}
gst-launch-1.0 -e udpsrc port=5600 caps="application/x-rtp, encoding-name=H264, payload=96" ! rtph264depay ! h264parse ! video/x-h264,stream-format=avc ! mp4mux ! filesink location=video.mp4
```
Wonderful! You should now have the building blocks to set up a stream and recording with GStreamer!
Warning:
With GStreamer, a single camera setup already requires quite a bit of work,
and recording multiple streams at once would also require quite a bit of work
and development.
We recommend [Discovery](https://dwe.ai/products/discovery) should your camera setups become complex.
The all-in-one multimedia solution for subsea network video streams.